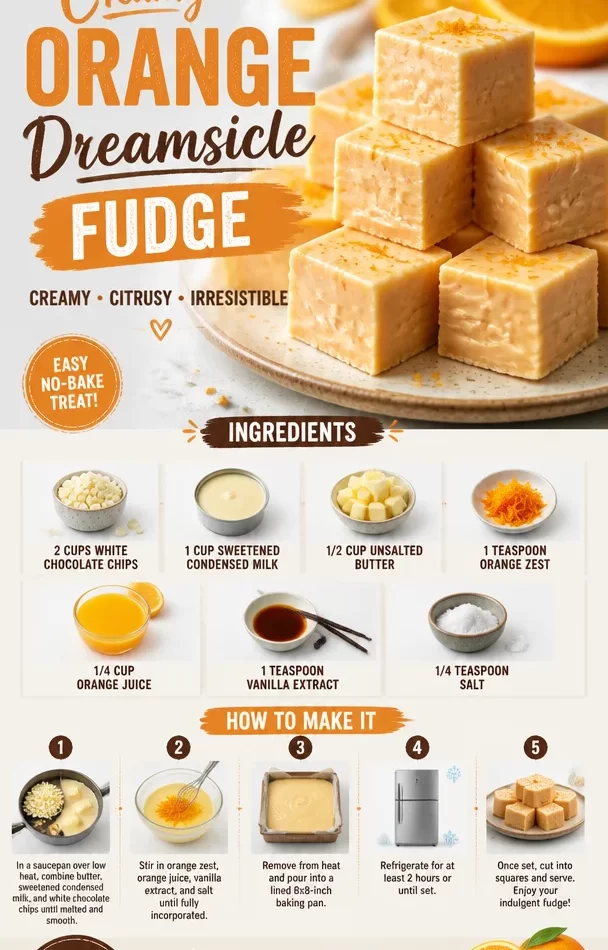
Creamy Orange Dreamsicle Fudge: A Sweet Slice of Nostalgia
Hey there, fellow food lover! If you’re anything like me, nothing brings back a rush of warm summer memories quite like the taste of creamy orange dreamsicle fudge. This delightful treat takes me back to childhood, where every sunny day meant a sweet, refreshing romp through the neighborhood followed by a chilly, dreamy snack that tasted just like a summer day.
Imagine biting into a piece of fudge that’s creamy, sweet, and zesty, evoking the sunshine and warmth of lazy afternoons. Who doesn’t want that? Today, we’ll be crafting this delicious fudge together, and I promise it’s easier than you might think. So roll up your sleeves, grab an apron, and let’s create something sweet that will not only satisfy your sweet tooth but also bring smiles all around the table!
A Personal Journey Through Flavor
I’ll never forget the summer days spent at my grandmother’s house, where the kitchen always smelled like magic and something delightful was always bubbling on the stove. She had this old rotary phone that would ring with that unique clatter, and every time it did, my heart would flutter with the thought of a new adventure. One of my favorite childhood snacks was her homemade orange creamsicle popsicles. I remember helping her mix the juice and yogurt, getting it all over the counters, and, of course, sneaking bites directly from the mixing bowl!
One particular afternoon, when we decided to turn that creamy, tangy goodness into fudge, a new tradition was born. With a little creativity and a splash of love, we transformed the popsicle dream into dreamy, melt-in-your-mouth squares of fudge. I still think of grandma every time I make this, and I hope it brings you as much happiness as it has brought me over the years.
Ingredients You’ll Need
Here’s what you’ll need to whip up this creamy orange dreamsicle fudge. Each ingredient plays a crucial role in delivering that rich, vibrant flavor we’re after.
-
2 cups white chocolate chips: A sweet base that melts beautifully, giving you that creamy texture. If you prefer a darker chocolate flavor, go ahead and swap in milk chocolate chips, but keep in mind it will alter the taste significantly.
-
1 cup sweetened condensed milk: This magical ingredient adds creaminess and sweetness. If you’re looking for a low-sugar alternative, try using evaporated milk mixed with a bit of stevia or another sweetener.
-
1/2 cup unsalted butter: Adds richness to the fudge while ensuring it stays smooth. Unsalted is best to control the saltiness, but if you only have salted butter at home, just skip adding additional salt.
-
1 teaspoon orange zest: This boosts the orange flavor and adds a lovely aroma. If you’re in a pinch, you can use jarred orange zest, but fresh is best for that bright taste.
-
1/4 cup orange juice: Freshly squeezed is ideal for an authentic flavor. Don’t substitute with store-bought juice if you can help it—it really amps up the freshness!
-
1 teaspoon vanilla extract: This rounds out the flavors and adds depth. Try using a pure vanilla extract for the best flavor; the imitation kind just doesn’t cut it.
-
1/4 teaspoon salt: Just a pinch to bring out all those lovely flavors. You can use sea salt for that extra touch, or if you like a hint of something special, pink Himalayan salt adds a nice twist.
Step-by-Step Instructions
Alright, let’s dive into the fun part—cooking! Follow these steps, and you’ll have a batch of dreamy fudge in no time. Here’s how to do it:
-
Prep Your Pan: First things first, line an 8×8-inch baking pan with parchment paper, leaving some overhang to make removal easier. Lightly spray with cooking spray to ensure nothing sticks. This little step can save you a sticky situation!
-
Melt the Butter: Place your unsalted butter in a medium saucepan over low heat. Allow it to melt slowly, stirring occasionally until it becomes completely liquid. This is the start of something delicious!
-
Add the Chocolate Chips: Once the butter is melted, add the white chocolate chips. Keep stirring gently over low heat until the chocolate is melted and the mixture is smooth. It’s important to keep the heat low to prevent the chocolate from seizing.
-
Incorporate Sweetened Condensed Milk: Stir in the sweetened condensed milk until fully combined, then increase the heat slightly. This will help melt everything and form a luscious, creamy mix.
-
Zest and Juice: Now it’s time for the orange goodness! Add the orange zest, orange juice, vanilla extract, and salt to the mixture. Stir well to incorporate all those fresh flavors. Oh, how the kitchen will smell divine at this point!
-
Pour into the Pan: Once everything is well mixed and pretty much perfect, remove it from the heat and pour it into your prepared baking pan. Use a spatula to smooth the top evenly. There’s something so satisfying about watching it settle!
-
Chill: Cover the fudge with plastic wrap and pop it in the fridge for at least 2 hours or until firm. The longer you let it chill, the better the texture will be. Patience is key, but I promise it’s worth the wait!
-
Serve and Enjoy: Once set, lift the fudge out using the parchment paper overhang and cut it into squares. Admire your beautiful creation!
Serving Suggestions
To serve your creamy orange dreamsicle fudge, arrange the squares on a beautiful platter. A touch of orange zest or a sprinkling of edible flowers could elevate the presentation even more. Try stacking them up for a rustic feel or spreading them out in a single layer to showcase that gorgeous orange hue. These treats are perfect for picnics, summer parties, or just a cozy evening at home with friends!
Recipe Variations
Feeling adventurous? Here are a few fun twists to put your unique spin on this fudge:
-
Chocolate Swirls: Drizzle some melted dark or milk chocolate on top before chilling for a delicious marbled effect.
-
Nutty Crunch: Add chopped nuts like pecans or almonds for a crunchy texture contrast.
-
Berry Goodness: Fold in small pieces of dried cranberries or cherries for an unexpected burst of flavor.
-
Spicy Kick: Add a pinch of cayenne pepper to the mixture for an exciting underlying heat that pairs surprisingly well with the sweet orange.
Chef’s Notes
Making this fudge has become a delightful tradition in my home. Over the years, I’ve learned that the key to perfect fudge is all about patience and the right technique. In my earlier days, I often ended up with a grainy mess—definitely not ideal! But I promise, with this method, you’ll achieve that creamy, dreamy texture every time. Oh, and don’t be afraid to play around! Cooking should be about experimentation and having fun in the kitchen!
FAQs and Troubleshooting
-
Why is my fudge too soft?: If your fudge didn’t set properly, it might need a little more chilling time. Make sure it’s completely cooled before cutting it.
-
Can I use different chocolates?: Absolutely! While white chocolate gives it that classic dreamsicle taste, experimenting with milk or dark chocolate can yield delicious variations.
-
How do I know when the fudge is set?: The fudge should feel firm to the touch and no longer sticky once it’s chilled for a few hours.
-
Can I freeze the fudge?: Yes! Just wrap it well in plastic wrap and then place it in an airtight container. It can last up to 2 months in the freezer. Just thaw it in the fridge before serving!
Nutritional Info (Optional)
While I haven’t included the exact nutritional details here, you can generally estimate that a small piece of this delicious fudge packs in a good balance of sweet, creamy indulgence. Keep in mind the ingredients—especially if you choose to add in nuts or swap out chocolate types—as they will affect the calorie count and nutrition profile.
With all these tips in your back pocket, you’re ready to create creamy orange dreamsicle fudge that sings of summer. Enjoy your culinary adventure, and don’t forget to share it with friends and family because great food is made even better when shared! Let’s get cooking, and may every bite transport you back to those sunny childhood memories. Happy fudge-making!
PrintCreamy Orange Dreamsicle Fudge
A delightful treat that evokes warm summer memories with its creamy, sweet, and zesty flavor, reminiscent of childhood orange creamsicle popsicles.
- Prep Time: 15 minutes
- Cook Time: 15 minutes
- Total Time: 120 minutes
- Yield: 16 servings 1x
- Category: Dessert
- Method: Chilling
- Cuisine: American
- Diet: Vegetarian
Ingredients
- 2 cups white chocolate chips
- 1 cup sweetened condensed milk
- 1/2 cup unsalted butter
- 1 teaspoon orange zest
- 1/4 cup orange juice
- 1 teaspoon vanilla extract
- 1/4 teaspoon salt
Instructions
- Prep Your Pan: Line an 8×8-inch baking pan with parchment paper, spray lightly with cooking spray.
- Melt the Butter: Place unsalted butter in a medium saucepan over low heat and melt.
- Add the Chocolate Chips: Stir in white chocolate chips until melted and smooth.
- Incorporate Sweetened Condensed Milk: Mix in sweetened condensed milk until fully combined.
- Zest and Juice: Add orange zest, orange juice, vanilla extract, and salt, stirring until well combined.
- Pour into the Pan: Pour the mixture into the prepared baking pan, smoothing the top.
- Chill: Cover with plastic wrap and refrigerate for at least 2 hours until firm.
- Serve and Enjoy: Lift the fudge out using parchment overhang, cut into squares, and serve.
Notes
Experiment with variations like chocolate swirls or nutty crunch for unique flavors!
Nutrition
- Serving Size: 1 piece
- Calories: 250
- Sugar: 30g
- Sodium: 50mg
- Fat: 12g
- Saturated Fat: 7g
- Unsaturated Fat: 3g
- Trans Fat: 0g
- Carbohydrates: 30g
- Fiber: 0g
- Protein: 2g
- Cholesterol: 20mg
Keywords: fudge, dessert, summer treat, orange, creamy, nostalgic