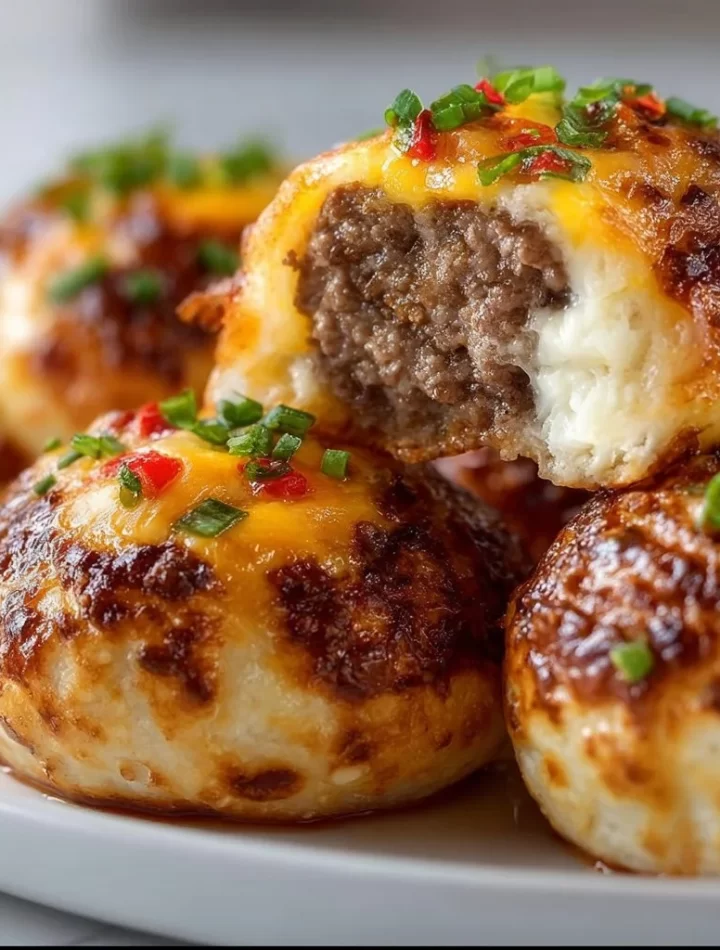
Cheeseburger Bombs: A Fun Twist on a Classic!
Introduction
Hey there, food enthusiasts! If there’s one comfort food that never fails to hit the spot, it’s a good ol’ cheeseburger. But what if I told you there’s a way to enjoy all that beefy, cheesy goodness in an even more fun and portable way? Enter: Cheeseburger Bombs. Picture this: warm, golden-brown biscuit dough encasing seasoned ground beef and melty cheddar cheese, ready to be devoured in a single bite. It’s like a cheeseburger and a pastry had a delicious lovechild, and I can’t wait to share the secrets of this irresistible recipe with you!
I first stumbled upon the idea for cheeseburger bombs during a casual get-together with friends. We all had a craving for burgers, but the thought of firing up the grill felt a bit too ambitious for a lazy Saturday afternoon. So, I threw some ideas around and before I knew it, we were rolling out biscuit dough, stuffing it with all the cheeseburger essentials, and concocting these delightful little pockets of joy. The first bite was pure magic! It took me back to summer barbecues, backyard games, and the warm, happy vibes of good company. Since then, these cheeseburger bombs have become a go-to for game nights, picnics, or any time I want to impress my friends (without too much fuss).
Ready to embark on this fun culinary adventure with me? Grab your apron and let’s dive in!
Personal Story
Growing up, weekends in my house were all about the backyard grill. My dad would fire up the BBQ, and my siblings and I would scatter around the yard, eagerly waiting for that smoky, mouthwatering aroma to fill the air. As the sun began to set, we’d gather around the picnic table, where he would bring out his famous cheeseburgers. Those burgers weren’t just any burgers; they were masterpieces topped with all the fixings — crisp lettuce, juicy tomatoes, crunchy pickles, and, of course, a gooey slice of melted cheese.
Those meals felt like celebrations, where laughter mingled with the delicious flavors of family bonding. With every bite, it felt like a taste of summer, no matter what season it was. Fast forward to now, and while I love those classic cheeseburgers, I also crave that playful nostalgia. Cheeseburger bombs remind me of those carefree days, bringing all the joy of a backyard barbecue but wrapped in a cozy, flaky blanket. They’ve become an instant crowd-pleaser in my own home, taking those cherished memories and wrapping them up in a buttery, golden dough.
Ingredients
To make these delightful cheeseburger bombs, gather the following ingredients:
-
1 lb Ground Beef: The star of the show! Choose a ground beef with a good fat content for extra flavor. You can also swap for turkey or plant-based alternatives if you prefer.
-
2 Cloves Garlic, Minced: Garlic adds a wonderful depth of flavor. Feel free to use pre-minced garlic or garlic powder if you’re in a pinch.
-
1 Cup Shredded Cheddar Cheese: The ooey-gooey goodness that pulls everything together. Swap cheddar for mozzarella or pepper jack for a spicier kick!
-
1 Package Refrigerated Biscuit Dough: This is what hugs all the fillings! I love the buttery flavor, but feel free to use crescent roll dough for a flakier vibe.
-
Salt and Pepper to Taste: These basic seasonings enhance the flavor. Don’t be shy—season generously!
-
Butter, for Brushing: A little melted butter brushed on top gives them a beautiful golden color and adds richness. Olive oil works as a lighter alternative.
-
Optional: Pickles and Mustard for Serving: Serve these on the side for that extra cheeseburger flair. You can swap mustard for ketchup or any sauce of your choice!
Step-by-Step Instructions
Now that you’ve got your ingredients ready, let’s start cooking! Follow these easy steps:
Step 1: Preheat Your Oven
Preheat your oven to 375°F (190°C). While it’s heating up, you can tackle the filling!
Step 2: Cook the Ground Beef
In a medium skillet over medium heat, add the ground beef. Break it up with a spatula. As it starts to brown, sprinkle in some salt and pepper. After about 5 minutes, add the minced garlic, stirring it in for an additional minute until fragrant.
Chef’s Tip: Drain any excess fat if you’re using higher-fat ground beef to prevent sogginess later.
Step 3: Add the Cheese
Once the beef is cooked through, remove it from heat and mix in the shredded cheddar cheese until it’s melted and gooey. This is the moment where everything becomes cheesy harmony!
Quick Insight: For a twist, experiment with different cheese types—blue cheese adds a robust flavor, while pepper jack gives a spicy kick!
Step 4: Get the Biscuit Dough Ready
Open the package of refrigerated biscuit dough. Lay the biscuits out on a clean surface. If using crescent dough, pinch the seams together to create a single sheet.
Step 5: Fill the Dough
Take a biscuit and gently flatten it in the palm of your hand. Spoon about a tablespoon of the cheesy beef mixture into the center. Carefully pinch the dough around the filling, sealing it tightly to prevent any cheese from leaking out during baking.
Chef’s Hack: Create a “nest” in your palm just before adding the filling. It makes sealing easier!
Step 6: Brush with Butter & Bake
Place the filled bombs seam-side down on a greased baking sheet. Brush the tops with melted butter to encourage that golden crust we love.
Slide the baking sheet into your preheated oven and bake for about 12-15 minutes, or until they are puffed and golden brown. The smell is going to be heavenly!
Step 7: Let Them Cool a Bit
Once out of the oven, let your cheeseburger bombs cool for about 5 minutes before diving in. This helps avoid burnt fingers and allows the cheese to set slightly.
Serving Suggestions
When it comes to serving these cheeseburger bombs, presentation is key! Arrange them on a large platter to create a beautiful spread. For that classic cheeseburger feel, serve with a side of pickles and mustard. You might even drizzle some extra melted cheese on top or pop a toothpick in each bomb for easy grabbing. If you’re feeling fancy, sprinkle some fresh chopped parsley for a pop of color!
Recipe Variations
-
Veggie Delight: Substitute ground beef with chopped mushrooms and bell peppers for a veggie-packed option. You can even add a hint of Worcestershire sauce for an umami punch.
-
BBQ Bombs: Mix in some BBQ sauce with the beef for a smoky twist, and consider adding some crispy onions for a crunchy texture.
-
Spicy Cheddar: Use spicy cheese varieties like pepper jack or add diced jalapeños to the beef mixture for a little heat.
-
Breakfast Bombs: Swap the ground beef for scrambled eggs and add in cooked bacon bits with cheese for a delightful breakfast treat.
-
Sweet Tooth: For dessert, try a sweet version with cinnamon sugar and apple pie filling encased in biscuit dough!
Chef’s Notes
Every recipe I create has a story, and this one is no different. Originally, I was hesitant about using biscuit dough for anything but breakfast. However, the first time I made cheeseburger bombs opened my eyes to the versatility of this humble ingredient. Plus, who can resist the crispy yet tender exterior that holds all these juicy flavors? Homemade versions have evolved over time; I’ve experimented with various fillings and learned to adapt to my guests’ preferences. I love hearing their reactions, especially when they take that first bite!
FAQs and Troubleshooting
1. Can I make these ahead of time?
Absolutely! You can assemble the cheeseburger bombs a day in advance, keeping them in the fridge, then bake them when you’re ready. Just add a few extra minutes to the baking time.
2. What do I do if my bombs leak during baking?
It happens to the best of us. Ensure the edges of the biscuit dough are tightly sealed. If leakage occurs, you can strategically place a baking sheet under your baking pan to catch any drips.
3. How do I store leftovers?
Store any leftovers in an airtight container in the fridge for up to 3 days. Reheat them in the oven (at 350°F for about 10 minutes) to achieve that fresh-baked taste again!
4. Can I freeze cheeseburger bombs?
You sure can! Freeze them before baking. Place them in a single layer on a baking sheet until solid, then transfer to a freezer bag. When you’re ready, bake directly from frozen, adding a few extra minutes to the baking time.
Nutritional Info
(Per serving, based on a recipe yielding 8 bombs)
- Calories: 250
- Protein: 12g
- Carbohydrates: 15g
- Fat: 15g
- Fiber: 1g
Conclusion
There you have it! A delightful, easy-to-make recipe for cheeseburger bombs that capture the essence of your favorite burger in a fun and shareable way. Whether you’re feeding a crowd or just indulging in a cozy night in, these little bites are bound to impress. So, gather your ingredients and get cooking – I can’t wait to hear how your bombs turn out! Let’s make some memories around the table, one delicious bite at a time. Happy cooking!
PrintCheeseburger Bombs

A portable and fun twist on classic cheeseburgers, these cheeseburger bombs feature seasoned ground beef and melted cheddar cheese wrapped in flaky biscuit dough.
- Prep Time: 15 minutes
- Cook Time: 15 minutes
- Total Time: 30 minutes
- Yield: 8 servings 1x
- Category: Appetizer
- Method: Baking
- Cuisine: American
- Diet: N/A
Ingredients
- 1 lb Ground Beef
- 2 Cloves Garlic, Minced
- 1 Cup Shredded Cheddar Cheese
- 1 Package Refrigerated Biscuit Dough
- Salt and Pepper to Taste
- Butter, for Brushing
- Optional: Pickles and Mustard for Serving
Instructions
- Preheat your oven to 375°F (190°C).
- Cook the ground beef in a skillet over medium heat, breaking it apart with a spatula.
- Add salt and pepper as it starts to brown, then mix in minced garlic for 1 minute.
- Remove from heat and mix in shredded cheddar cheese until melted.
- Open the package of biscuit dough and lay the biscuits out on a clean surface.
- Flatten each biscuit slightly and spoon about a tablespoon of the beef mixture into the center.
- Pinch the dough around the filling to seal tightly.
- Brush the tops with melted butter and place seam-side down on a greased baking sheet.
- Bake for about 12-15 minutes, until puffed and golden brown.
- Let them cool for 5 minutes before serving.
Notes
For added flavor, serve with pickles and mustard. You can also experiment with different cheese types and additional ingredients for variations.
Nutrition
- Serving Size: 1 bomb
- Calories: 250
- Sugar: 1g
- Sodium: 400mg
- Fat: 15g
- Saturated Fat: 7g
- Unsaturated Fat: 6g
- Trans Fat: 0g
- Carbohydrates: 15g
- Fiber: 1g
- Protein: 12g
- Cholesterol: 40mg
Keywords: cheeseburger, appetizer, snacks, easy recipe, party food