Cherry Pie Bubble Up Dessert: A Nostalgic Sweet Treat
Hey there, fellow food lovers! Today I’m thrilled to share a recipe that’s not just a dessert; it’s a little slice of nostalgia wrapped in a warm, buttery blanket. We’re diving into the world of Cherry Pie Bubble Up Dessert—a delightful concoction that’s as fun to make as it is to eat. Imagine tender, flaky biscuit pieces soaking up sweet cherry goodness and topped with a light drizzle of icing. It’s perfect for gatherings, family dinners, or just an everyday treat that says, “I love you!”
Cherry pie is definitely a classic, but this bubble up version takes it to a whole new level. You still get that delicious cherry filling and the essence of pie, but with a twist that makes every bite feel like a cozy hug. Plus, it’s incredibly easy to whip up! With just a handful of ingredients, you’re on your way to a scrumptious dessert that will have everyone reaching for seconds.
A Sweet Memory to Share
Let me take you back a few years to one of my favorite family gatherings—a sunny summer afternoon sprinkled with laughter, chatter, and the sweet aroma of classic desserts wafting through the house. My grandma, a kitchen wizard herself, would always make her famous cherry pie. It was her signature dish, and no family reunion felt complete without it. The whole house would buzz with excitement as we eagerly awaited her arrival, pie in hand.
Each year, my siblings and I would gather around the kitchen table, sharing stories and giggles while Grandma rolled out the dough, showing off her secret skill of creating the perfect fluted edge. Her cherry pie was iconic, with an irresistible flaky crust and the most luscious filling that made our taste buds sing. As she cut into that golden crust, cherry juice would spill out like a sweet treasure, and we’d dive in with forks like pirates seeking plunder.
Now, while I cherish Grandma’s recipe, I’ve created this Cherry Pie Bubble Up Dessert that pays homage to my childhood favorite but brings a modern, playful twist. It captures that same essence of flaky crust and luscious filling while being completely approachable for anyone in the kitchen. So, let’s create some memories together with this delicious dessert!
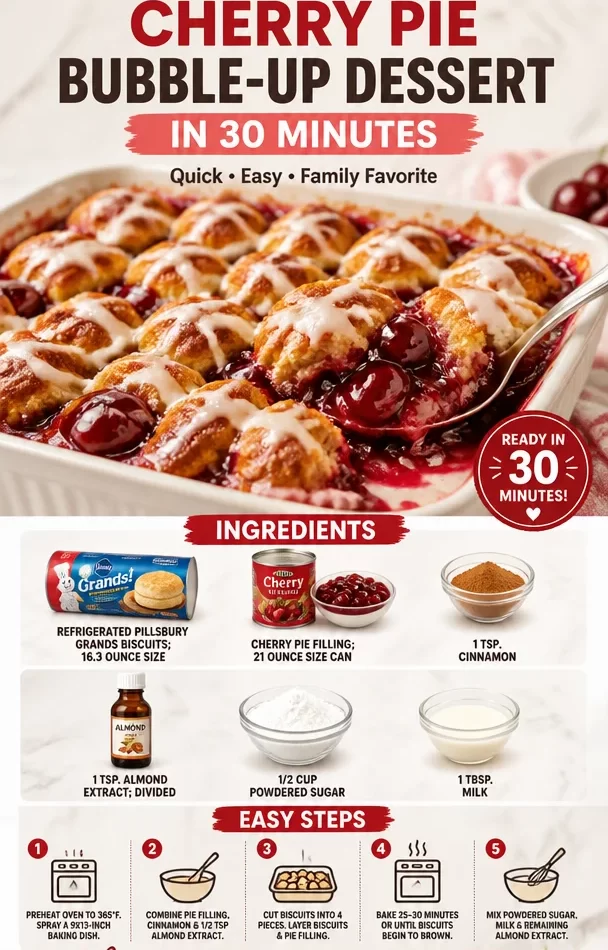
Ingredients
Here’s what you’ll need to bring this Cherry Pie Bubble Up Dessert to life:
-
Refrigerated Pillsbury Grands Biscuits (16.3 ounces)
These flaky biscuits create the perfect “bubble” for our dessert. If you’re feeling adventurous, you can swap them for homemade biscuit dough or crescent roll dough for a different texture. -
Cherry Pie Filling (21 ounces)
The star ingredient! Sweet, tangy, and full of juicy cherries. You can substitute with other fruit fillings, like blueberry or peach, if cherries aren’t your jam. -
1 tsp. Cinnamon
A warm spice that pairs beautifully with cherries. For a different flavor twist, try nutmeg or allspice. -
1 tsp. Almond Extract (divided)
Almond and cherry are a match made in heaven! If you’re not a fan, vanilla extract can be used as a substitute. -
1/2 cup Powdered Sugar
This will make our delightful icing. If you’re looking for a healthier option, powdered coconut sugar can work in a pinch. -
1 tbsp. Milk
Just to bring the icing together. Dairy-free? Try almond milk or oat milk!
Step-by-Step Instructions
-
Preheat Your Oven
First things first, let’s preheat that oven to 350°F (175°C). The key to a bubbly, golden dessert is starting with a hot oven! -
Prepare the Biscuits
Open the can of biscuits—be careful, they can pop! Cut each biscuit into quarters. This step is super easy and a great way to relieve any stress from the day. You’ll end up with fluffy biscuit pieces that will soak in the cherry filling beautifully. -
Combine the Ingredients
In a large bowl, toss your quartered biscuits with the cherry pie filling, cinnamon, and half of the almond extract until everything is lightly coated. This is where the flavors begin to blend—you want every biscuit piece lovingly coated in that vibrant cherry goodness. -
Transfer to a Baking Dish
Grease a 9×13-inch baking dish. Gently pour the biscuit and cherry mixture into the dish, spreading it out evenly. Make sure to get all that delicious filling in there—there’s no sense in leaving any behind! -
Bake to Perfection
Pop the baking dish in the preheated oven for about 30-35 minutes. Watch as those biscuit pieces puff up and turn golden brown. The amazing scent will start to fill your kitchen, drawing in anyone nearby—trust me! -
Create the Icing
While your dessert is baking, let’s whip up a simple icing. In a small bowl, combine the powdered sugar, milk, and the remaining almond extract. Mix until smooth. This icing adds a sweet finishing touch, and it doesn’t hurt to sneak a taste! -
Drizzle and Serve
Once your dessert is golden and bubbly, remove it from the oven and let it cool slightly—if you can resist! Drizzle the icing over the warm dessert to create that beautiful, inviting look.
Serving Suggestions
When it’s time to serve, grab a large spoon and dish out generous portions into bowls. For that extra touch, top with a dollop of whipped cream or a scoop of vanilla ice cream. The warm cherries combined with cold ice cream create an irresistible contrast. Garnish with fresh mint leaves for a pop of color and freshness—get ready for compliments!
Recipe Variations
Feeling adventurous? Here are some fun twists to elevate this dessert:
-
Berry Blend: Swap out the cherry filling for a mix of your favorite berries for a summer-inspired dessert.
-
Chocolate Drizzle: Drizzle melted chocolate over the icing for a rich touch.
-
Nutty Crunch: Add chopped nuts, like pecans or almonds, to the bottom of the baking dish before adding the biscuit mixture for added texture.
-
Cinnamon Sugar Crunch: Before baking, sprinkle a cinnamon-sugar mix over the top for an extra layer of sweetness.
-
Vegan Version: Use vegan biscuits and plant-based milk to create a vegan-friendly dessert.
Chef’s Notes
This recipe has evolved from my grandma’s classic cherry pie into a fun, cozy dessert that feels like a warm hug. I’ve had my fair share of baking mishaps—like the time I accidentally grabbed chili powder instead of cinnamon (yikes!). But that’s the beauty of cooking; it’s about experimenting and embracing the journey. Each baking session is an opportunity to create and share, and I love how this Cherry Pie Bubble Up Dessert keeps bringing smiles to faces.
FAQs and Troubleshooting
1. Can I use fresh cherries instead of pie filling?
Absolutely! Just be sure to pit and chop them and mix with a bit of sugar to help create a syrupy filling.
2. Why did my biscuits not rise?
Check your baking powder’s expiration date, as old leavening agents can affect rising. Also, ensure your oven is properly heated before baking.
3. Can I make this dessert ahead of time?
You can prepare the biscuit and cherry filling mixture ahead of time, but I recommend baking it fresh for the best texture.
4. How do I store leftovers?
Keep any leftovers in an airtight container in the fridge for up to 3 days. Just reheat in the oven or microwave to bring back that warm, gooey goodness.
Nutritional Info (Optional)
While I love indulging in sweets, it’s also great to be mindful. This Cherry Pie Bubble Up Dessert serves about 12, and each serving has approximately:
- Calories: 230
- Total Fat: 8g
- Carbohydrates: 36g
- Protein: 2g
Friends, I hope you’re as excited to make this Cherry Pie Bubble Up Dessert as I am! It embodies the essence of home, nostalgia, and, most importantly, loving togetherness. Now, grab those ingredients and let’s get cooking—it’s time to create something truly unforgettable!
PrintCherry Pie Bubble Up Dessert
A nostalgic dessert featuring flaky biscuits and sweet cherry filling, topped with a delightful icing.
- Prep Time: 15 minutes
- Cook Time: 35 minutes
- Total Time: 50 minutes
- Yield: 12 servings 1x
- Category: Dessert
- Method: Baking
- Cuisine: American
- Diet: Vegetarian
Ingredients
- 1 can Refrigerated Pillsbury Grands Biscuits (16.3 ounces)
- 1 can Cherry Pie Filling (21 ounces)
- 1 tsp. Cinnamon
- 1 tsp. Almond Extract (divided)
- 1/2 cup Powdered Sugar
- 1 tbsp. Milk
Instructions
- Preheat your oven to 350°F (175°C).
- Open the can of biscuits and cut each into quarters.
- Combine the quartered biscuits with the cherry pie filling, cinnamon, and half of the almond extract in a large bowl.
- Transfer the mixture to a greased 9×13-inch baking dish.
- Bake for about 30-35 minutes until golden brown.
- Create the icing by mixing the powdered sugar, milk, and remaining almond extract.
- Drizzle the icing over the warm dessert before serving.
Notes
For added texture, consider adding chopped nuts or a cinnamon-sugar mix before baking. Serve with whipped cream or ice cream for a contrast of temperatures.
Nutrition
- Serving Size: 1 serving
- Calories: 230
- Sugar: 15g
- Sodium: 270mg
- Fat: 8g
- Saturated Fat: 3g
- Unsaturated Fat: 5g
- Trans Fat: 0g
- Carbohydrates: 36g
- Fiber: 1g
- Protein: 2g
- Cholesterol: 0mg
Keywords: cherry pie, dessert, bubble up, nostalgic, sweets