Heavenly Oreo Lemon Dessert: A Sweet Symphony of Flavor
Hey there, dessert lovers! If you’re anything like me, you understand that the best moments often revolve around sweet treat – that moment when a luscious dessert melts in your mouth, and all your cares fade away. Today, I’m thrilled to share my recipe for a Heavenly Oreo Lemon Dessert that combines the rich chocolatey goodness of Oreos with the zesty brightness of lemon. It’s a match made in culinary heaven!
This dessert is super easy to whip up and perfect for any occasion—whether you’re hosting a cozy gathering, celebrating a special day, or simply craving a delicious treat. As we dive into this recipe together, get ready to impress your friends and family with a dessert that looks fancy but is entirely approachable and fun to make.
A Sweet Memory
Let me take you back to a beautiful summer afternoon when my best friend threw a BBQ in her backyard. The sun was shining, the grill was sizzling, and laughter filled the air. Everyone was anxiously waiting for dessert, which always sparked the best conversations. That’s when my friend brought out her crowd-pleaser: a lemon dessert layered with crushed chocolate cookies that was just absolutely divine.
As everyone took their first bite, a chorus of "mmm" and "oh wow" echoed around the table. It was a masterful blend of flavors: creamy, tangy, and sweet—paired with that irresistible crunch of chocolate. Right then and there, I decided I wanted to create my own version of that delightful treat, one that would bring people together and create happy memories just like that day. Fast forward to today, and I’m excited to share my Heavenly Oreo Lemon Dessert with all of you!
Ingredients: Gather the Goodness
Before we get cooking, let’s take a look at the ingredients you’ll need. Each one plays an important role, so I’ve included a quick chef’s insight for you to spice up your cooking game:
-
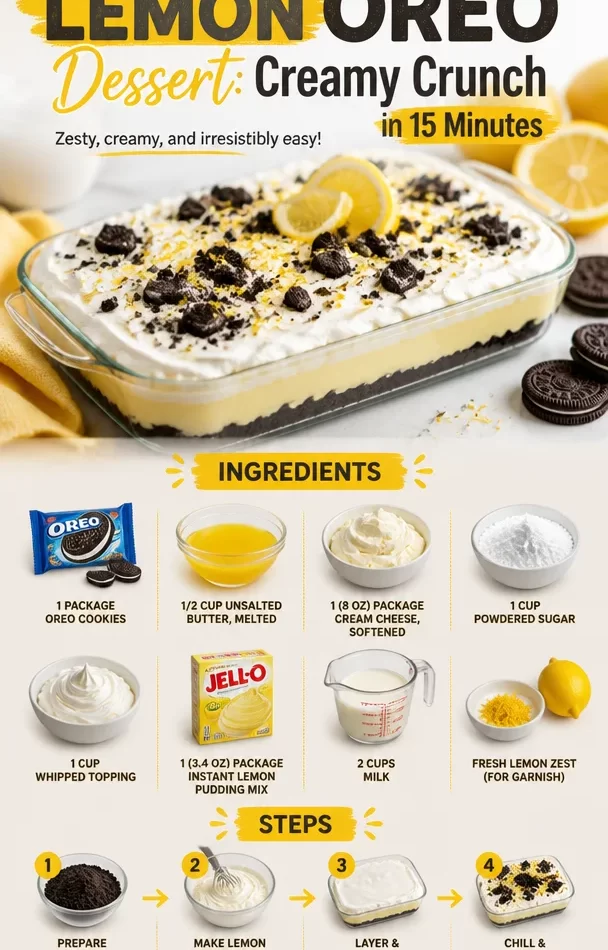
1 package Oreo cookies: These classic cookies will be the star of our dessert. If you prefer a twist, feel free to swap them for any chocolate wafer cookies!
-
1/2 cup unsalted butter, melted: The melted butter helps to bind the crushed cookies together for the crust. For a dairy-free option, you could use coconut oil.
-
1 (8 oz) package cream cheese, softened: This creamy goodness adds richness and a delightful texture. If you’re after a lighter option, try using Neufchâtel cheese.
-
1 cup powdered sugar: Sweetens up the cream cheese. If you’re watching your sugar intake, you can use a powdered sugar alternative like monk fruit.
-
1 cup whipped topping: This adds lightness and fluffiness. If you’d prefer a homemade version, use freshly whipped cream mixed with a touch of sugar.
-
1 (3.4 oz) package instant lemon pudding mix: The key ingredient for that zesty lemon flavor. You can swap this with instant vanilla pudding if you’re feeling adventurous.
-
2 cups milk: This is combined with the pudding mix to create that luscious filling. Almond or coconut milk can work just as well!
-
Fresh lemon zest (for garnish): Zest adds both color and invigorating aroma! Don’t skip it—your dessert deserves this finishing touch.
Step-by-Step Instructions: Let’s Get Cooking!
Now that we’ve gathered our ingredients, let’s get started on this heavenly creation. Just follow these simple steps:
-
Prepare the Cookie Crust:
- Tip: Preheat your oven to 350°F (175°C) while you work on the crust.
- In a food processor, crush the Oreo cookies until they form fine crumbs. It should look like sand!
- In a bowl, mix the crushed Oreos with the melted butter until the crumbs are fully coated.
- Tip: If you don’t have a food processor, you can place the cookies in a resealable plastic bag and crush them with a rolling pin. Perfect stress relief, right?
-
Press the Crust:
- Pour the Oreo mixture into a 9×13 inch baking dish. Press down firmly to create an even layer. You can use the bottom of a cup or your fingers to pack it tightly.
- Tip: Bake the crust for 10 minutes. This helps it set and achieve that delightful crunch.
-
Make the Cream Cheese Layer:
- In a large bowl, beat the softened cream cheese with a hand mixer until smooth and creamy.
- Gradually add in the powdered sugar and mix well until combined and fluffy.
-
Fold in the Whipped Topping:
- Gently fold in the whipped topping until it’s all well combined. The mixture should be light and airy.
- Tip: Be careful while folding to keep that lovely volume in the mix!
-
Spread Over the Crust:
- Once the crust is cool, spread the cream cheese mixture evenly over it.
-
Prepare the Lemon Pudding Filling:
- In a new bowl, whisk together the instant lemon pudding mix with 2 cups of milk.
- Keep whisking until it thickens (about 2 minutes).
-
Layer the Pudding:
- Spread the lemon pudding over the cream cheese layer in the dish.
- Tip: Give it a gentle tap on the counter afterward to eliminate any air bubbles!
-
Chill Your Masterpiece:
- Cover the dish with plastic wrap and refrigerate for at least 4 hours (or preferably overnight) to let all those lovely layers meld together.
- Tip: This step is crucial; it enhances the flavors and sets the textures!
Serving Suggestions: Plate it Up!
When it’s time to serve, take a moment to appreciate your creation! Cut into squares, and place them on individual dessert plates. For that extra touch, drizzle some chocolate sauce over each square or add a dollop of extra whipped topping. Don’t forget that fresh lemon zest—it’ll make your dessert pop visually!
Recipe Variations: Get Creative!
Now that you know the basics, here are a few fun twists you can play with:
- Berry Bliss: Layer with fresh blueberries or raspberries for an added burst of fruitiness.
- Nutty Touch: Add chopped nuts like pecans or almonds into the crust for some added crunch.
- Minty Fresh: Mix in a bit of mint extract or fresh mint into the cream cheese layer for a refreshing twist.
- Chocolate Lovers: Substitute a portion of the cream cheese layer with chocolate cream cheese for an indulgent combo.
- Gluten-Free Option: Use gluten-free chocolate cookies for the crust if you want a gluten-free version.
Chef’s Notes: Sweet Reflections
Every recipe tells a story, and as I’ve created this Heavenly Oreo Lemon Dessert over the years, it has evolved into a favorite not just for me but for countless friends and family. One of the funniest moments I recall was when I triple-checked my crust wasn’t burnt, only to find that my oven was still set to “self-clean”! Through those little mishaps, I’ve learned to embrace the chaos and enjoy the process of cooking. So don’t worry—if things don’t go perfectly, you’re in good company!
FAQs and Troubleshooting
Here are answers to some common questions you might have as you embark on your baking adventure:
-
Can I make this dessert a day ahead?
- Absolutely! In fact, making it ahead of time allows the flavors to meld beautifully. Just keep it tightly covered in the fridge.
-
What if I don’t have fresh lemon for zest?
- If fresh lemons aren’t available, bottled lemon juice can work in a pinch, but fresh is always best for that vibrant flavor.
-
Help! My pudding didn’t thicken!
- Make sure you’re using instant pudding mix; it won’t thicken if you accidentally bought the cook-and-serve kind. If that happens, simply let it sit for a bit longer or re-whisk!
-
How long will leftovers last?
- If there are leftovers (and there usually are not!), they can be stored in the fridge for about 3-4 days. Just be sure to cover it well.
Nutritional Info (optional)
This dessert is a fun treat—indulgent yet delightful! However, I encourage you to enjoy it in moderation as part of a balanced diet. Pair it with some fresh fruit or a light meal to balance things out.
And there you have it—my Heavenly Oreo Lemon Dessert recipe that’s perfect for sharing and creating memories! I hope you give it a try and enjoy every bite as much as I do. Remember, cooking should be fun and a way to express your creativity, so don’t hesitate to experiment and make it your own. Happy cooking, friend! 🥳🍋🍫
PrintHeavenly Oreo Lemon Dessert

A delightful dessert combining rich Oreos with zesty lemon for a perfect sweet treat.
- Prep Time: 20 minutes
- Cook Time: 10 minutes
- Total Time: 240 minutes
- Yield: 12 servings 1x
- Category: Dessert
- Method: Refrigerating
- Cuisine: American
- Diet: Vegetarian
Ingredients
- 1 package Oreo cookies
- 1/2 cup unsalted butter, melted
- 1 (8 oz) package cream cheese, softened
- 1 cup powdered sugar
- 1 cup whipped topping
- 1 (3.4 oz) package instant lemon pudding mix
- 2 cups milk
- Fresh lemon zest (for garnish)
Instructions
- Preheat your oven to 350°F (175°C).
- Crush the Oreo cookies in a food processor until fine crumbs form.
- Mix the crushed Oreos with melted butter until fully coated.
- Pour the Oreo mixture into a 9×13 inch baking dish and press down firmly to create an even layer.
- Bake the crust for 10 minutes to help it set.
- Beat the softened cream cheese until smooth with a hand mixer.
- Gradually add in the powdered sugar until fluffy.
- Fold in the whipped topping gently until well combined.
- Spread the cream cheese mixture evenly over the cooled crust.
- Whisk together the instant lemon pudding mix with 2 cups of milk until it thickens (about 2 minutes).
- Spread the lemon pudding over the cream cheese layer.
- Cover the dish with plastic wrap and refrigerate for at least 4 hours, preferably overnight.
- Cut into squares and serve with chocolate sauce, whipped topping, and fresh lemon zest.
Notes
Make ahead for the best flavor. Can substitute fresh lemon zest with bottled lemon juice in a pinch.
Nutrition
- Serving Size: 1 square
- Calories: 250
- Sugar: 18g
- Sodium: 250mg
- Fat: 11g
- Saturated Fat: 5g
- Unsaturated Fat: 5g
- Trans Fat: 0g
- Carbohydrates: 36g
- Fiber: 1g
- Protein: 3g
- Cholesterol: 20mg
Keywords: Oreo dessert, lemon dessert, summer dessert, no bake dessert