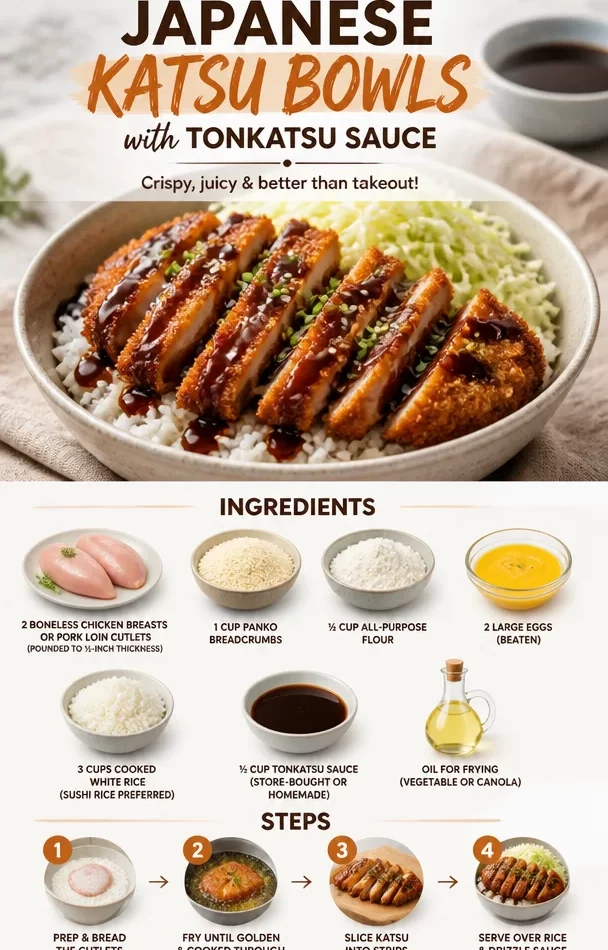
Unleash Your Inner Chef: Japanese Katsu Bowls with Tonkatsu Sauce
Hey there friends! 🥢 If you’re like me, nothing hits the spot quite like a warm, crispy Katsu bowl drizzled with rich Tonkatsu sauce. This dish perfectly combines crunch, softness, and a plethora of flavors that make every bite a celebration. Whether you’re hosting a dinner party or simply craving something comforting on a Tuesday, this Katsu bowl will surely impress. So, roll up those sleeves and let’s get started!
Personal Story
Let me take you back to a chilly winter evening a few years ago when I first tried my hand at making Katsu. It was one of those nights where the wind howled outside, and the thought of stepping out for dinner felt particularly unappealing. Drawing inspiration from my favorite Japanese restaurant, I decided it was time to whip up a Katsu bowl at home. The aroma of frying chicken filled my kitchen, instantly lifting my spirits. When I first cut into that crispy exterior, juices flowed out, creating a torrent of flavor. I plated it atop a bed of perfectly cooked rice, drizzled on that umami-packed Tonkatsu sauce, and garnished with bright green scallions. That first bite was a moment of joy and warmth, and it became one of those "I could eat this every week" dishes! Since then, my Katsu bowls have evolved, but the heartwarming essence remains the same. Now, let’s create that perfect bowl together!
Ingredients
Before we dive into the cooking, let’s prepare our ingredient list. These key players will ensure your Katsu bowls turn out both delicious and satisfying:
-
2 boneless chicken breasts or pork loin cutlets (pounded to ½-inch thickness)
Pounding the meat ensures even cooking and a tender bite. You can also use thin cuts of beef if preferred. -
1 cup panko breadcrumbs
These Japanese breadcrumbs create that perfectly light and crispy texture. If gluten-free is your jam, look for gluten-free panko alternatives. -
½ cup all-purpose flour
The flour helps the egg adhere to the meat, resulting in an even coating. For a gluten-free version, almond flour works well. -
2 large eggs (beaten)
Eggs act as a binder, helping the breadcrumbs stick. For a vegan option, you can use flaxseed meal mixed with water (1 tablespoon of flaxseed to 2.5 tablespoons of water, let it sit for a few minutes). -
3 cups cooked white rice (sushi rice preferred)
Sushi rice offers that perfect sticky texture. If you can’t find sushi rice, any medium-grain white rice will do just fine! -
½ cup tonkatsu sauce (store-bought or homemade)
This sweet and savory sauce is the star of your dish! Feel free to make it from scratch for a twist — just mix ketchup, Worcestershire sauce, soy sauce, and a touch of sugar. -
Oil for frying (vegetable or canola)
You need enough oil for shallow frying to achieve that crispy dream! Corn oil is also a great alternative. Never skimp on the oil; it helps mimic the restaurant experience at home!
Step-by-Step Instructions
Alright, let’s roll up our sleeves and get cooking! Here’s how to whip up these delectable Katsu bowls step by step.
-
Prepare the Chicken (or Pork)
Place your chicken breasts or pork loin cutlets between two sheets of plastic wrap. With a meat mallet, pound them down until they are approximately ½ inch thick. This process is key for tenderness and ensures they cook evenly. Season both sides generously with salt and pepper for that kick of flavor! -
Set Up Your Coating Station
In three separate bowls, arrange your flour, beaten eggs, and panko breadcrumbs. First, set a large frying pan over medium heat and pour in enough oil to cover the bottom. You’ll want about ½ inch of oil in there — think of it as a luxurious bath for your Katsu. -
Bread the Meat
Take each pounded piece of meat and coat it first in flour, shaking off any excess. Move to the beaten egg, ensuring each piece is thoroughly coated. Finally, press it into the panko breadcrumbs, making sure to cover every inch. This triple-dipping technique will ensure that perfect crunch we’re after! -
Fry the Katsu
Once the oil is shimmering (a small drop of water should sizzle — be careful!), gently place the breaded meat in the pan. Fry each side for about 4–5 minutes or until golden brown and crispy. If you’re frying multiple pieces, be careful not to overcrowd the pan — you want that oil to work its magic without cooling down. -
Drain the Katsu
When your Katsu is beautifully golden, transfer it to a paper towel-lined plate to drain. This step is crucial for keeping that crunch intact! While it rests, prepare your rice. -
Cook the Rice
If you haven’t pre-cooked the rice, now’s the time! Rinse your sushi rice under cold water until the water runs clear. Cook it according to the package instructions — typically, that’s a ratio of 1 part rice to 1.2 parts water. Add a pinch of salt to the water for flavor! -
Assemble Your Bowls
To assemble, scoop some rice into a bowl, slice your Katsu into strips, and place it atop the rice. Drizzle the Tonkatsu sauce artfully over the Katsu. Top it off with thinly sliced scallions and maybe some pickled ginger for a pop of color and flavor.
Serving Suggestions
When it comes to plating, I like to keep it simple yet inviting. Create a mound of rice in the center of your bowl and lay the crispy Katsu pieces on top. Drizzle a generous amount of Tonkatsu sauce to let that umami flavor shine through. Garnish with freshly sliced scallions and a sprinkle of sesame seeds if you have them on hand. Trust me; it adds that beautiful touch that not only looks great but enhances the flavor. You can also serve this alongside a small salad or some pickled veggies to balance out the richness!
Recipe Variations
Looking for a new twist? Here are a few variations to keep things fresh with your Katsu bowls:
-
Curry Katsu Bowl: Add a spoonful of Japanese curry sauce over the top for a heartier dish.
-
Vegetable Katsu: Try using eggplant or zucchini slices instead of meat. Just coat them the same way, and enjoy a lighter, meat-free option.
-
Spicy Mayo Drizzle: Mix mayonnaise with a bit of Sriracha for a spicy kick when drizzling over your Katsu.
-
Add a Soft-Boiled Egg: A runny egg on top brings that dreaminess — simply boil eggs for 6-7 minutes, cool, peel, and place them on your bowl!
-
Sesame Crunch: For a nutty flavor, toss sesame seeds in with your panko for extra crunch and an Asian flavor boost!
Chef’s Notes
Over the years, I have played with this Katsu recipe quite a bit and discovered that sometimes the simplest tweaks make the biggest difference. For instance, I’ve experimented with various sauces, and while I adore traditional Tonkatsu, a splash of homemade teriyaki or even garlic aioli has made its way into my rotation. As with any dish, the key is to make it your own. Don’t hesitate to bring in your own flair or story!
No two Katsu bowls will ever be the same, and that’s the joy of cooking! I once made a massive batch for a potluck, and as we sat around the table, I listened to everyone’s different takes on what was their favorite part of the dish. It turned into a taste-testing evening, but that’s what it’s all about, right?
FAQs and Troubleshooting
-
Why is my Katsu not crispy?
If your Katsu ends up soggy, check the oil temperature. If it’s too low, the coating will soak up oil rather than fry. Make sure the oil is shimmering before you add the meat. -
Can I bake the Katsu instead of frying?
Yes! For a healthier option, after breading the Katsu, place them on a baking sheet lined with parchment paper, and spray lightly with oil. Bake at 400°F (205°C) for about 20-25 minutes, flipping halfway through. -
How do I store leftovers?
If you happen to have any leftovers, store the Katsu separately from the rice in an airtight container in the fridge. When ready to eat, reheat in the oven or an air fryer for that crispy goodness! -
What can I serve with Katsu?
Katsu pairs beautifully with a side of steamed veggies, a simple salad, or even some miso soup for a fuller Japanese dining experience.
Nutritional Info
While it’s difficult to provide exact nutritional information due to variation in serving sizes and ingredients, a typical serving of Katsu bowls (including rice and sauce) could range from 600-800 calories.
So there you have it! Your ultimate guide to making delicious Japanese Katsu bowls at home. I hope this inspires you to cook at your peak and share some fantastic Katsu goodness with your friends and family. Let’s keep this journey delicious—grab your apron, and happy cooking!
PrintJapanese Katsu Bowls with Tonkatsu Sauce
Warm, crispy Katsu bowls drizzled with rich Tonkatsu sauce, combining crunch and softness in every bite.
- Prep Time: 15 minutes
- Cook Time: 30 minutes
- Total Time: 45 minutes
- Yield: 4 servings 1x
- Category: Main Course
- Method: Frying
- Cuisine: Japanese
- Diet: Non-Vegetarian
Ingredients
- 2 boneless chicken breasts or pork loin cutlets (pounded to ½-inch thickness)
- 1 cup panko breadcrumbs
- ½ cup all-purpose flour
- 2 large eggs (beaten)
- 3 cups cooked white rice (sushi rice preferred)
- ½ cup tonkatsu sauce (store-bought or homemade)
- Oil for frying (vegetable or canola)
Instructions
- Prepare the Chicken (or Pork) by pounding the meat to ½ inch thickness and seasoning with salt and pepper.
- Set Up Your Coating Station with flour, beaten eggs, and panko breadcrumbs in separate bowls.
- Bread the Meat by coating it in flour, then egg, and finally panko breadcrumbs.
- Fry the Katsu in hot oil for about 4–5 minutes on each side until golden brown.
- Drain the Katsu on a paper towel-lined plate to keep it crispy.
- Cook the Rice if not pre-cooked, rinsing and cooking according to package instructions.
- Assemble Your Bowls with a scoop of rice, sliced Katsu, and drizzled Tonkatsu sauce, garnished with scallions.
Notes
For a healthy option, the Katsu can be baked instead of fried. Variations include Curry Katsu Bowl and Vegetable Katsu.
Nutrition
- Serving Size: 1 serving
- Calories: 700
- Sugar: 8g
- Sodium: 600mg
- Fat: 20g
- Saturated Fat: 3g
- Unsaturated Fat: 12g
- Trans Fat: 0g
- Carbohydrates: 80g
- Fiber: 2g
- Protein: 30g
- Cholesterol: 150mg
Keywords: Japanese Katsu, Tonkatsu, comfort food, fried chicken