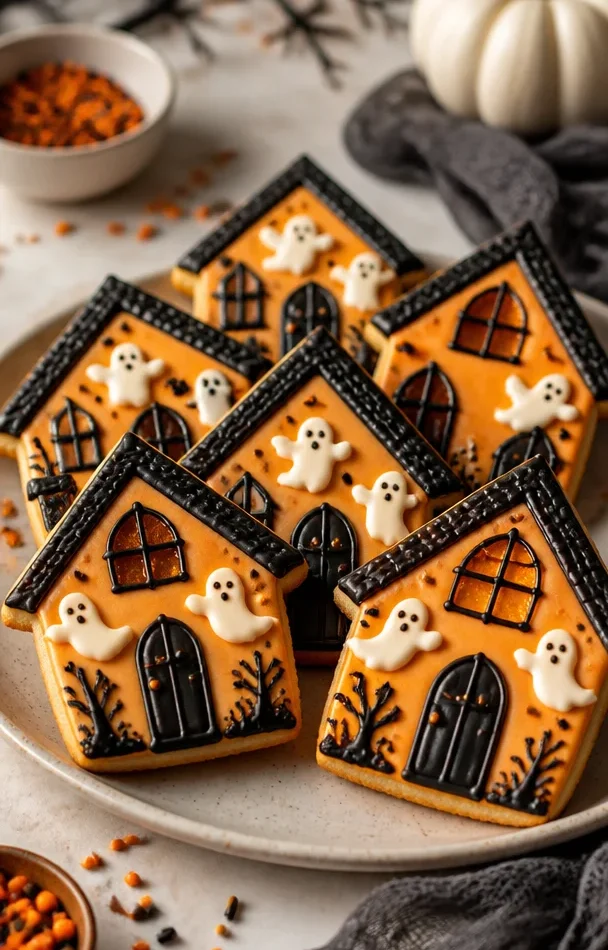
Haunted House Cookies: A Sweetly Spooky Treat
Welcome to my cozy corner of the culinary world! Today, we’re diving into a delightful fusion of art and flavor that’s perfect for the fall season – Haunted House Cookies! These whimsical treats are not only rich and satisfying, but they’re also perfect for getting into the spirit of Halloween. Imagine spending a delightful afternoon in the kitchen, surrounded by the scents of vanilla and confectionery sugar, all while crafting cookies that are downright adorable and a little spooky. So, grab your apron, and let’s get baking!
A Sweet Memory from My Childhood
Growing up, Halloween was one of my absolute favorite holidays. It wasn’t just about the costumes or the candies; it was about creating memories with my family in the kitchen. Every year, my mother and I would bake sugar cookies, transforming the kitchen into a delightful chaos of flour, icing, and colored sprinkles. One year, my mom decided to take our sugar cookie game up a notch by introducing “haunted house” themes. We carved pumpkins that could be seen through our kitchen window and decorated little ghost cookies that we’d sneak from the cooling rack when we thought no one was looking. Those afternoons spent giggling, icing cookies, and bonding as a family sparked my love for baking. Fast forward to today, I cherish those memories as I continue to create similar experiences with friends and fellow food lovers in my own kitchen.
Ingredients
Here’s what you will need to bring these Haunted House Cookies to life:
- 2 3/4 cups all-purpose flour – The backbone of our cookies! Use this for that perfect softness. If you’re gluten-free, consider using a 1:1 gluten-free flour blend for a magic of equal measure.
- 1 teaspoon baking soda – This little ingredient provides the rise. Make sure it’s fresh for the best texture!
- 1/2 teaspoon baking powder – Works hand-in-hand with baking soda for cookie perfection.
- 1 cup unsalted butter, softened – The secret to that melt-in-your-mouth experience. Substitute with vegan butter for a dairy-free twist.
- 1 1/2 cups white sugar – Sweetness is key! You can also swap half of it for brown sugar for a caramel touch.
- 1 egg – Helps bind our ingredients together. For vegan options, substitute with 1/4 cup of unsweetened applesauce or a flax egg (1 tablespoon flaxseed meal + 2.5 tablespoons water).
- 1 teaspoon vanilla extract – A classic flavor enhancer in baking. Don’t skimp on quality!
- 1 teaspoon almond extract – Adds a lovely layer of flavor that elevates our cookies.
- Royal icing (for decoration) – Essential for that spooky detailing! You can make this with powdered sugar, meringue powder, and water or avoid it for a simple glaze.
Step-by-Step Instructions
Now that we have our ingredients, let’s get into the fun part – baking these Haunted House Cookies!
-
Preheat Your Oven – Start by preheating your oven to 375°F (190°C). This lets the cookies cook evenly.
-
Combine the Dry Ingredients – In a medium bowl, whisk together the flour, baking soda, and baking powder. This is an important step; it ensures the raising agents are evenly distributed. Set aside.
-
Cream the Butter and Sugar – In a large mixing bowl, beat the softened butter and sugar together until it’s light and fluffy. This usually takes about 3-5 minutes. Pro tip: Use room-temperature butter for the best results!
-
Add Egg and Extracts – Once that mixture is fluffy, add the egg, vanilla, and almond extract. Beat until combined. The mixture should be smooth and creamy!
-
Incorporate Dry Ingredients – Gradually mix the dry ingredients into the wet ingredients using a spatula until no flour streaks remain. Don’t overmix – just until everything is well combined!
-
Chill the Dough – Wrap the dough in plastic wrap and refrigerate for at least 30 minutes. This step helps the cookies hold their shape when baking.
-
Roll Out the Dough – Between two sheets of parchment paper, roll out the chilled dough to about 1/4-inch thick. Use cookie cutters to create your haunted house shapes!
-
Bake the Cookies – Place your cookie shapes on ungreased baking sheets and bake in the preheated oven for 8 to 10 minutes, or until the edges are lightly golden. Let them cool on the tray for a few minutes before transferring them to a wire rack.
-
Decorate – Once cooled, it’s time for the fun part! Prepare your royal icing and get creative. Use piping bags to draw spooky faces, and add details like ghosts and tombstones.
Serving Suggestions
These Haunted House Cookies make for an eye-catching dessert at any Halloween gathering or fall party. When plating, consider arranging them on a dark platter to enhance their spookiness. A sprinkle of edible glitter can provide a whimsical touch. You could also accompany the cookies with a warm cup of cider or a spooky punch for that extra festive feel.
Recipe Variations
- Chocolate Haunted House Cookies – Add 1/2 cup of cocoa powder to the dough for a chocolaty twist.
- Spiced Cookies – Incorporate spices like cinnamon or nutmeg for a warm, autumnal flavor.
- Royal Icing Alternatives – If you prefer a simpler approach, use fondant or chocolate to create your spooky decorations.
- Gluten-Free Option – Use gluten-free flour and ensure all other ingredients are gluten-free as well.
- Fun Mix-Ins – Incorporate mini chocolate chips or dried fruit for a tasty surprise!
Chef’s Notes
Over the years, my Haunted House Cookies have evolved from simple shapes to intricate designs with colorful icing. I’ve experimented with flavor combinations and techniques, and every year, they seem to get a little more creative. My friends often challenge me to come up with new themes and narratives around the cookies, which adds another layer of fun to this whole process!
FAQs and Troubleshooting
- My cookies spread too much! What did I do wrong? – This could be due to warm dough. Ensure you chill your dough well before baking.
- How do I keep the cookies soft? – Store them in an airtight container to keep them fresh.
- Can I prepare the dough in advance? – Absolutely! You can refrigerate it for up to 3 days or freeze for several weeks. Just let it thaw in the fridge before rolling out.
- My royal icing didn’t set! What happened? – Ensure to use the right consistency; it should be stiff enough to hold its shape.
Nutritional Info
These Haunted House Cookies are both indulgent and versatile. Each cookie (based on a standard size) generally contains about 120 calories, with 5 grams of fat and 16 grams of carbohydrates, making them a fun treat without going overboard. Remember to adjust your serving sizes depending on how you decorate them – those adorable designs can add a little extra sweetness!
Final Thoughts
Creating Haunted House Cookies is more than just baking; it’s about crafting delightful experiences and memories in the kitchen. Whether you’re a seasoned baker or just getting started, this recipe is sure to bring joy into your kitchen. Don’t be afraid to get creative with your decorations, explore different flavors, and most importantly, share these tasty treats with loved ones. I hope you find as much joy in these cookies as I did in creating them! Happy baking, and may your holiday season be filled with sweetness and laughter!
PrintHaunted House Cookies
Delightful Haunted House Cookies perfect for Halloween, combining art and flavor for a sweet treat.
- Prep Time: 30 minutes
- Cook Time: 10 minutes
- Total Time: 40 minutes
- Yield: 24 cookies 1x
- Category: Dessert
- Method: Baking
- Cuisine: American
- Diet: Vegetarian
Ingredients
- 2 3/4 cups all-purpose flour
- 1 teaspoon baking soda
- 1/2 teaspoon baking powder
- 1 cup unsalted butter, softened
- 1 1/2 cups white sugar
- 1 egg
- 1 teaspoon vanilla extract
- 1 teaspoon almond extract
- Royal icing (for decoration)
Instructions
- Preheat your oven to 375°F (190°C).
- Combine the dry ingredients in a medium bowl and whisk together.
- Cream the butter and sugar in a large mixing bowl until light and fluffy.
- Add the egg, vanilla, and almond extract, beating until combined.
- Incorporate the dry ingredients into the wet ingredients until well combined.
- Chill the dough in plastic wrap for at least 30 minutes.
- Roll out the dough to 1/4-inch thick between parchment paper.
- Bake the cookies for 8 to 10 minutes or until lightly golden.
- Decorate with royal icing after they have cooled.
Notes
Store cookies in an airtight container to keep them fresh. You can prepare the dough in advance and refrigerate for up to 3 days.
Nutrition
- Serving Size: 1 cookie
- Calories: 120
- Sugar: 16g
- Sodium: 100mg
- Fat: 5g
- Saturated Fat: 3g
- Unsaturated Fat: 2g
- Trans Fat: 0g
- Carbohydrates: 16g
- Fiber: 0g
- Protein: 1g
- Cholesterol: 30mg
Keywords: Haunted House Cookies, Halloween Cookies, Holiday Baking, Spooky Treats, Sugar Cookies


