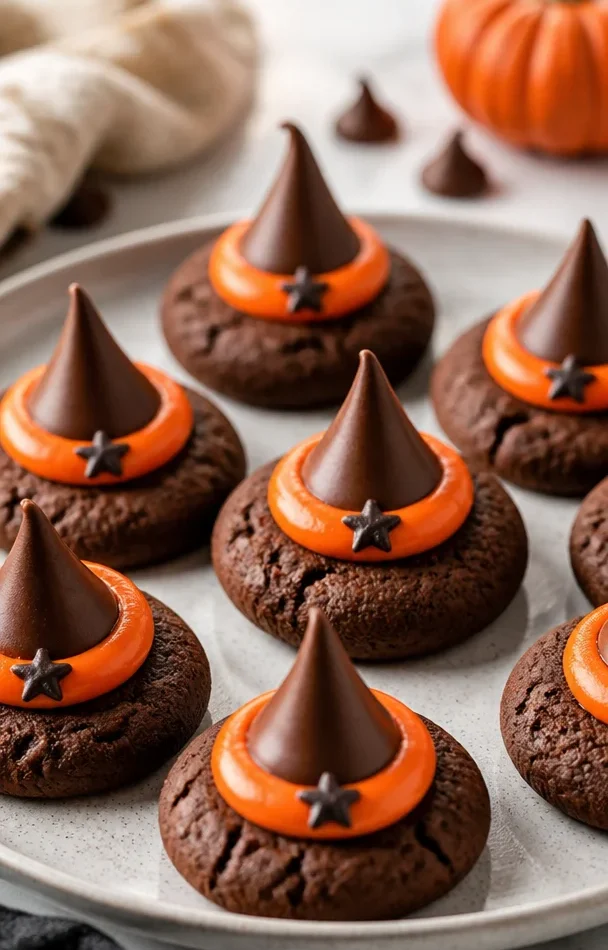
Welcome to my culinary corner! Today, I’m excited to share with you a unique and delightful recipe that’s perfect for any festive occasion: Witch Hat Cookies with chocolate kisses. As we step into the whimsical world of treats, let’s embrace the spirit of creativity, delight, and a dash of nostalgia that comes with sharing these adorable cookies. Whether you’re preparing for a Halloween party, a cozy gathering with friends, or simply want to indulge your sweet tooth, these Witch Hat Cookies promise to be a hit!
When I think about baking, some of my fondest memories come flooding back, specifically around the autumn season. I recall those days in my grandmother’s kitchen, where the aroma of baked goods filled the air and lovingly crafted treats emerged from the oven. Inspired by that nostalgic spirit, I developed this Witch Hat Cookie recipe as a tribute to the memories of tinkering in the kitchen with my family. These cookies are not only easy to make but also fun to decorate. Grab your apron, and let’s get baking together!
Personal Story
One of my cherished memories is from when I was a child. Every October, my family would gather to decorate the house for Halloween. My grandmother, the queen of all things sweet, always prepared a special batch of cookies for our festive festivities. Together, we would whip up sugar cookies, and after they cooled, we’d transform them into delightful shapes, from pumpkins to, you guessed it, witch hats!
Amongst the giggles and flour fights, my grandmother introduced me to the magic of the kitchen. She would patiently show me how to create the perfect icing, explaining that it was just as much about the process as it was about the product. Years later, I still find that same joy in creating treats that combine both playfulness and flavor. The Witch Hat Cookie embodies that spirit perfectly. It’s a wonderful way to combine creativity and deliciousness, making it a fantastic treat for both kids and adults alike.
Ingredients
Here’s what you need to make these adorable Witch Hat Cookies:
-
Chocolate Kiss Candies:
- The star of the show! These sweet little gems come in various flavors, but the classic milk chocolate is my favorite for this recipe. If you want to mix it up, try dark chocolate or caramel-filled kisses!
-
Sugar Cookies:
- You can either bake your own sugar cookies or purchase pre-made ones from your local bakery. If you’re baking from scratch, ensure they are slightly thicker to support the structure of the hat. For a substitute, use a shortbread cookie recipe for a buttery twist.
-
Black Decorating Icing:
- This icing is crucial for creating the witch hat’s brim and adding a fun touch to your cookies. You can easily make your own by combining powdered sugar, water, and a few drops of black food coloring.
-
Orange Sprinkles:
- These add a fun and festive flair to your cookies! Feel free to use any colorful sprinkles you like to achieve that Halloween vibe.
-
Parchment Paper:
- Not an ingredient per se, but an essential item for lining your baking sheets to prevent sticking and make cleanup easy.
Each ingredient plays a pivotal role in creating a well-rounded, visually appealing, and absolutely delicious cookie!
Step-by-Step Instructions
Now, let’s dive into the fun part—making these lovely Witch Hat Cookies! Follow these steps closely for the best results:
-
Prepare your workspace: Start by preheating your oven to 350°F (175°C). Line two baking sheets with parchment paper, ready to catch any cookie magic!
-
Mix the dough: In a large mixing bowl, combine your sugar cookie dough. If you’re using store-bought dough, ensure it’s fully thawed before rolling it out.
-
Shape the cookies: Roll the dough into 1.5-inch balls. Flatten them slightly on one side; this will form the base of your hat. Roll some more dough into a cone shape for each witch hat! Keep in mind that the base needs to be strong enough to hold the kiss without tipping over.
-
Bake the cookies: Place the shaped cookies on the baking sheets, ensuring they have some space between them. Bake for about 10-12 minutes or until the edges are just golden. Keep an eye on them to avoid overbaking!
-
Cool completely: Once baked, let the cookies cool on a wire rack. It’s essential to ensure they are fully cooled before decorating, or you risk melting the chocolate kisses!
-
Attach the kisses: Once cooled, take your chocolate kisses and gently press them into the center of the cookie base, making sure they are secure and upright.
-
Decorate with icing: Use the black decorating icing to pipe a circle around the base of each kiss, mimicking the brim of the witch’s hat. Add the orange sprinkles to finish it off, giving each cookie a festive flair.
-
Let the icing set: Allow your decorated cookies to sit for a bit so the icing can harden. This will ensure your cookies stay beautiful when served!
And there you have it! With these simple steps, you’ve crafted a batch of delightful Witch Hat Cookies that are sure to impress!
Serving Suggestions
When it comes to serving these whimsical Witch Hat Cookies, presentation is key. Here are a few fun ideas:
-
Plate them creatively: Arrange the cookies on a decorative platter. You can even add some faux spider webs or mini decorations around the cookies for that extra Halloween touch.
-
Incorporate into a dessert table: If you’re hosting a gathering, these cookies make an excellent addition to a dessert table alongside other seasonal treats like pumpkin pie or caramel apples.
-
Gift ready: These cookies also make fantastic homemade gifts! Package them in clear bags tied with a simple orange ribbon. Friends and family will appreciate your thoughtful (and delicious) gesture.
Recipe Variations
Feel free to customize your Witch Hat Cookies! Here are some creative twists to consider:
-
Flavored Cookies: Instead of traditional sugar cookies, try infusing your dough with cocoa for chocolate-flavored witch hats, or add a hint of almond extract for something unique!
-
Different Toppings: Swap out the black icing for colorful icing, creating a rainbow of hats. You can use purple or green icing to match different Halloween themes.
-
Gluten-Free Option: Use a gluten-free all-purpose flour blend to make your sugar cookies, allowing everyone to indulge without worry.
-
Alternative Chocolate: Expand the flavor profile by using flavored chocolate kisses, such as pumpkin spice or caramel, for a different surprise inside.
-
Add Nuts: For a crunch factor, sprinkle chopped nuts on the cookie base before adding the chocolate kiss.
Chef’s Notes
One of my favorite things about this recipe is its versatility. Over the years, I’ve seen it evolve—from simple icing decorations to elaborate candy designs that kids love to create. I’ve even had a few mishaps—like the time I accidentally used salt instead of sugar in my cookie dough! It became a laughing point, but it reminded me how much fun baking can be, even when things go awry.
Every time I prepare these cookies, I think back to those cherished moments spent with my grandmother, and I can’t help but smile. It’s a lovely reminder of how food connects us, creates memories, and brings joy.
FAQs and Troubleshooting
Here are some common questions you might have while making Witch Hat Cookies, along with solutions:
-
Why did my cookies spread too much?
- This can often be due to dough that’s too warm. Make sure to chill your dough for at least 30 minutes before shaping it. Also, check the freshness of your baking powder if you’re baking from scratch!
-
How can I get my icing to harden properly?
- Be patient! Let the icing set undisturbed in a cool environment. If it’s too warm, consider placing the cookies in the refrigerator for a few minutes.
-
Can I make the cookies in advance?
- Absolutely! You can bake and decorate them a day ahead of time. Just store them in an airtight container at room temperature.
-
What if I don’t have black icing?
- You can easily create your own by mixing cocoa powder with powdered sugar and water. Alternatively, a dark chocolate drizzle works too!
Nutritional Info
While indulging in sweets is always fun, being mindful of ingredients can be important! Here’s a general overview:
- Serving Size: Approximately 1 cookie
- Calories: 120
- Total Fat: 5g
- Saturated Fat: 2g
- Cholesterol: 10mg
- Sodium: 30mg
- Total Carbohydrates: 17g (including 8g of sugar)
- Protein: 1g
Keep in mind, the nutritional information may vary depending on the specific ingredients you choose to use.
Final Thoughts
Baking Witch Hat Cookies is more than just a simple recipe; it’s about creating memories that last a lifetime. It’s incredibly rewarding to see friends and family enjoying the fruits of your labor, especially when the treats are this much fun!
So, next time you find yourself in the kitchen, I invite you to whip up a batch of these delightful cookies. Enjoy the process, get creative with decorations, and feel free to make them your own. And don’t forget to share your creations with loved ones because laughter, love, and good food are the best ingredients in any recipe!
Happy baking, and I can’t wait to see what you come up with!
PrintWitch Hat Cookies

Delightful Witch Hat Cookies made with chocolate kisses, perfect for Halloween parties and festive gatherings.
- Prep Time: 20 minutes
- Cook Time: 12 minutes
- Total Time: 32 minutes
- Yield: 24 servings
- Category: Dessert
- Method: Baking
- Cuisine: American
- Diet: Vegetarian
Ingredients
- Chocolate Kiss Candies
- Sugar Cookies
- Black Decorating Icing
- Orange Sprinkles
- Parchment Paper
Instructions
- Prepare your workspace: Start by preheating your oven to 350°F (175°C). Line two baking sheets with parchment paper.
- Mix the dough: In a large mixing bowl, combine your sugar cookie dough.
- Shape the cookies: Roll the dough into 1.5-inch balls and flatten slightly; shape cones for witch hats.
- Bake the cookies: Place on baking sheets, bake for 10-12 minutes until edges are golden.
- Cool completely: Let the cookies cool on a wire rack.
- Attach the kisses: Gently press chocolate kisses into the center of each cookie base.
- Decorate with icing: Pipe black icing around the base of each kiss and add orange sprinkles.
- Let the icing set: Allow cookies to sit until the icing hardens.
Notes
These cookies can be customized with different flavored kisses or icing colors. Store in an airtight container for freshness.
Nutrition
- Serving Size: 1 cookie
- Calories: 120
- Sugar: 8g
- Sodium: 30mg
- Fat: 5g
- Saturated Fat: 2g
- Unsaturated Fat: 3g
- Trans Fat: 0g
- Carbohydrates: 17g
- Fiber: 0g
- Protein: 1g
- Cholesterol: 10mg
Keywords: Halloween cookies, Witch Hat Cookies, festive treats, chocolate cookies, sugar cookies