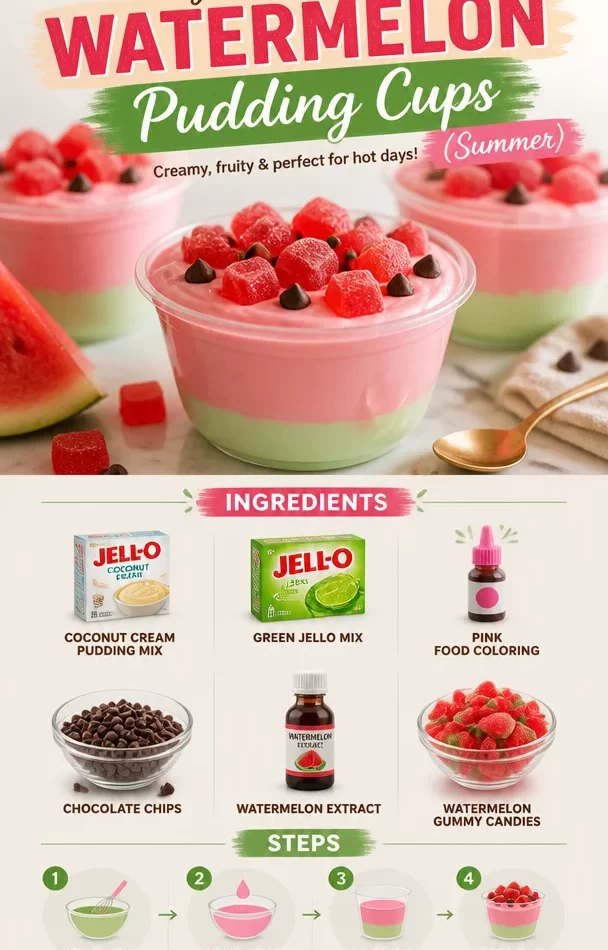
Easy Watermelon Pudding Cups – Only 4 Ingredients!
Summer is one of those magical seasons when food feels lighter, brighter, and definitely more fun. One of my favorite summer treats to whip up is none other than Watermelon Pudding Cups! Picture this: creamy, dreamy pudding that not only looks stunning but also tastes like a slice of summer itself. This dessert has a playful twist that will elevate any gathering—and trust me, it’ll be a hit with kids and adults alike. The best part? You only need four ingredients to make this delightful treat!
As a recipe developer, I’m always on the lookout for uncomplicated yet impressive dishes that can spark joy and conversation around the table. These pudding cups fit the bill perfectly. They are incredibly easy to prepare and can be customized in so many fun ways. You’re definitely going to want to make these for your next backyard barbecue or picnic; they’ll not only please the palate but visually dazzle the crowd!
A Slice of Nostalgia
The first time I made Watermelon Pudding Cups was with my niece Mia at her summer camp. It was a sweltering July afternoon, and all we could think about was how to cool down. We rummaged through the pantry and decided to get creative with some simple ingredients. We quickly turned a traditional pudding recipe on its head by adding a dash of watermelon extract and a splash of green Jello for that refreshing vibe.
Watching Mia’s face light up with excitement when we layered those colorful ingredients in clear cups was unforgettable. She was amazed at how vibrant and delicious the pudding turned out. Every scoop was a sweet reminder of summer—full of laughter and sunshine. Now, every time I make these Watermelon Pudding Cups, I think of that afternoon with Mia and the joy of creating something special together.
Ingredients
Here’s everything you need to make these refreshing Watermelon Pudding Cups:
-
Coconut Cream Pudding Mix
- This creamy mix serves as the base for your pudding cups. It brings a velvety texture and a light coconut flavor, perfect for complementing the watermelon. If you prefer, you can swap it out for vanilla pudding mix.
-
Green Jello Mix
- This bright green mix adds an exciting burst of flavor and a lush color to your dessert. The gelatinous texture represents the fresh green rind of a watermelon. An alternative could be lime gelatin for a tangy kick!
-
Pink Food Coloring
- This is where the fun happens! A few drops of pink food coloring bring the watermelon flesh to life. If you want to keep it all-natural, you can use a little beet juice as a natural dye.
-
Chocolate Chips
- These little bites of chocolate not only add a sweet surprise in each cup but also mimic the look of watermelon seeds. For a healthier option, consider using dark chocolate chips or even mini chocolate morsels.
-
Watermelon Extract
- This magic ingredient pulls the whole dish together. A few drops give that authentic watermelon flavor that transports you straight to a sunny picnic. If you can’t find watermelon extract, you could use a splash of fruit juice instead.
-
Watermelon Gummy Candies
- For the finishing touch, topping your pudding cups with gummy watermelon candies elevates presentation while delivering a fun and chewy texture. You can easily find these at most grocery stores!
Step-by-Step Instructions
Now that you’ve gathered all your ingredients, let’s dive into the magical process of creating your delightful Watermelon Pudding Cups!
1. Prepare Your Pudding
Start by whisking together 2 cups of cold milk with the coconut cream pudding mix in a large mixing bowl until smooth. This part is super simple—just whisk it vigorously for about 2 minutes until blended and thickened.
Chef’s Tip: Chill the milk in the fridge for about 30 minutes before using. This keeps your pudding nice and cold right from the start!
2. Mix in Watermelon Flavor
Next, add in 1-2 teaspoons of watermelon extract, depending on your personal taste preference. If you love that fresh watermelon flavor, don’t be shy! Stir it well to ensure it’s fully incorporated.
Commentary: The extract might seem optional, but it transforms the pudding from ordinary to extraordinary. It really captures that sweet summer vibe!
3. Color it Pink
Now it’s time for a little fun! Add a few drops of pink food coloring into the pudding mix. Stir gently until you achieve a lovely pink hue. The vibrant color will definitely catch everyone’s eye!
Chef’s Hack: Don’t go overboard with the coloring; start with a drop or two and mix until you’re happy with the shade. You can always add more but can’t take it away!
4. Prepare the Jello Layer
In a separate bowl, prepare the green Jello mix according to package instructions. Typically, you’ll need one cup of boiling water and one cup of cold water. Mix until the gelatin is fully dissolved.
Tip: Give the Jello some time to cool slightly before using it. This way, it won’t melt your beloved pudding layer when combined.
5. Layer Your Cups
Now comes the most exciting part: layering! In clear cups, spoon in a generous layer of the coconut pudding first, about halfway up the cup. Then, pour the green Jello mixture over the pudding layer until it fills the cup almost to the top.
Chef’s Insight: Use a piping bag or a zip-top bag with the corner cut off to make layering more precise and clean. You’ll be thrilled with how fancy they look!
6. Top it Off
Finally, sprinkle some mini chocolate chips on top to mimic watermelon seeds. And if you really want to impress, add a watermelon gummy candy for that finishing touch!
Final Thought: These pudding cups are all about the fun and presentation. Don’t rush; take your time to create something beautiful.
Serving Suggestions
When it comes to serving, a simple, colorful display always wows! Arrange the cups on a bright platter, and feel free to garnish with extra watermelon slices or mint leaves for a pop of green. Perfect for summer parties, these cups can be made a day ahead, stored in the fridge, and served chilled.
Recipe Variations
Here are a few fun twists you can try with your Watermelon Pudding Cups:
-
Berry Fusion: Swap out watermelon extract for raspberry or strawberry extract, keeping your pudding pink and fruity.
-
Creamy Layer: Layer in whipped cream between the pudding and Jello for an even creamier treat.
-
Coconut Whipped Cream: Top with dairy-free coconut whipped cream instead of regular whipped cream for a tropical flair.
-
Minty Fresh: Add some finely chopped mint to the pudding mix for a refreshing touch.
-
Healthy Option: Substitute sugar-free Jello and pudding for a lighter version without sacrificing flavor.
Chef’s Notes
As I’ve developed this recipe over time, I’ve discovered how versatile it can be. At first, I used just vanilla pudding, but once I introduced coconut cream, it took on a life of its own! My friends love how adaptable this dessert is; it’s become a staple at every summer gathering. I can’t help but chuckle thinking about one potluck where someone tried to stack their cups too high without support, and they collapsed like a summer day under the sun! Just keep them steady and secure, and you’re good to go!
FAQs and Troubleshooting
Q: Can I make this recipe dairy-free?
Absolutely! Use coconut or almond milk in place of regular milk for both the pudding mix and Jello, and you’ll have a tasty dairy-free dessert.
Q: What if my Jello layer doesn’t set properly?
If your Jello isn’t setting, it might be due to using a metal container or not letting it cool down properly. Ensure you’re using a plastic or glass container and give it enough chill time to firm up.
Q: How long can these pudding cups be stored?
These pudding cups are best enjoyed within 2-3 days. Just keep them covered in the fridge, and they will remain fresh!
Q: Can I use fresh watermelon instead of Jello?
While fresh watermelon is delicious, its moisture content makes it tricky for layering. Opt for Jello to get that fun texture and stable layer.
Nutritional Info
(When applicable, you might want to consider adding approximate nutritional breakdowns as needed.)
Crafting these Easy Watermelon Pudding Cups doesn’t just fill the belly; it also fills the soul with joy. I hope you’ll give them a try and enjoy the sweet memories they bring! Happy cooking, and let’s reach that peak together!
PrintEasy Watermelon Pudding Cups
These Watermelon Pudding Cups are a fun and refreshing summer treat made with just four ingredients.
- Prep Time: 15 minutes
- Cook Time: 10 minutes
- Total Time: 25 minutes
- Yield: 4 servings 1x
- Category: Dessert
- Method: Mixing and Layering
- Cuisine: American
- Diet: Vegetarian
Ingredients
- 1 package Coconut Cream Pudding Mix
- 1 package Green Jello Mix
- Pink food coloring
- Mini chocolate chips
- 1–2 teaspoons Watermelon Extract
- Watermelon Gummy Candies (for topping)
Instructions
- Prepare your pudding by whisking together 2 cups of cold milk with the coconut cream pudding mix in a large bowl until smooth.
- Add in 1-2 teaspoons of watermelon extract and stir well.
- Add a few drops of pink food coloring into the pudding mix and stir until you achieve a desired pink hue.
- Prepare the green Jello mix according to package instructions with one cup of boiling and one cup of cold water.
- Layer in clear cups, starting with a layer of coconut pudding, then pour over the green Jello mixture.
- Top with mini chocolate chips and a watermelon gummy candy for decoration.
Notes
These pudding cups can be made a day ahead and stored in the fridge. They’re perfect for summer gatherings!
Nutrition
- Serving Size: 1 cup
- Calories: 250
- Sugar: 20g
- Sodium: 200mg
- Fat: 6g
- Saturated Fat: 4g
- Unsaturated Fat: 2g
- Trans Fat: 0g
- Carbohydrates: 45g
- Fiber: 0g
- Protein: 2g
- Cholesterol: 15mg
Keywords: watermelon pudding, summer dessert, easy dessert, no-bake dessert, kid-friendly recipe