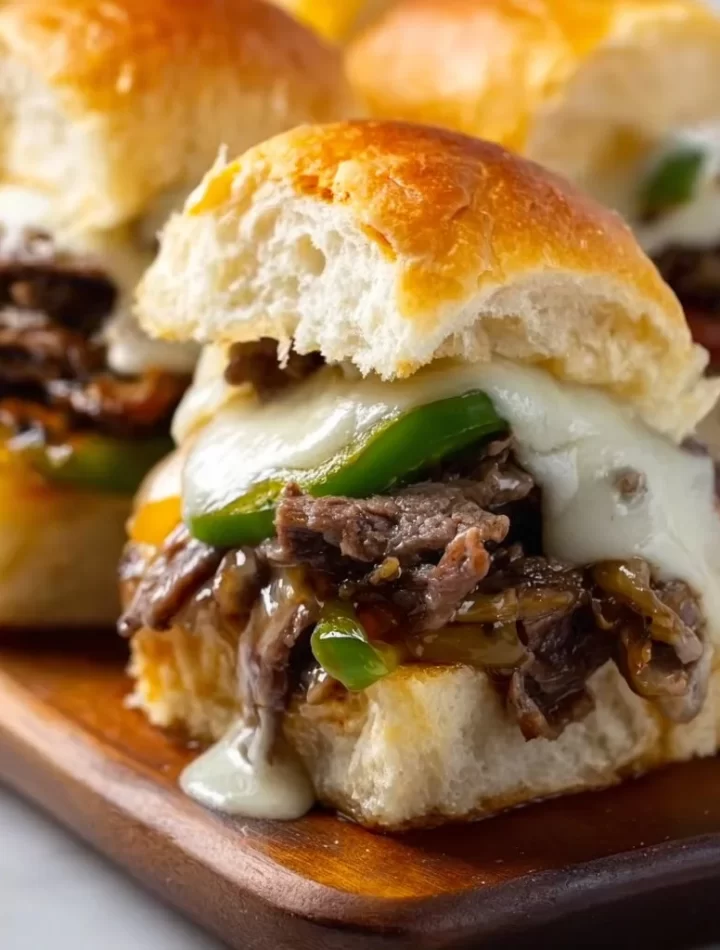
Philly Cheesesteak Sliders: Your New Go-To Crowd-Pleasers!
Hey there, foodies! If there’s one dish that can rally folks around the dinner table faster than a hot Twitter trend, it’s got to be a Philly Cheesesteak. Now, imagine taking that classic and transforming it into bite-sized sliders perfect for sharing—enter Philly Cheesesteak Sliders! These little gems pack all the mouthwatering flavors of the original sandwich, but they’re effortlessly adorable and perfect for any occasion, from game day to a cozy night in with friends.
I can still hear the sizzling sound of onions and peppers hitting the skillet and the sweet aroma filling the kitchen like a warm hug. Growing up, my family made a tradition out of Sunday dinners—a time when we would all come together after a busy week. One of our favorite meals was a cheesesteak night where we’d gather around the stove, chatting and laughing as we prepped the ingredients. That’s where the love for these sliders was born. Not only did everyone feel satisfied, but the joy of sharing those flavorful bites made it feel extra special.
So, let’s break down how to create these mouthwatering Philly Cheesesteak Sliders from scratch. You don’t need any culinary degree to pull this off; all you need is some love, a hot pan, and a dash of humor!
Personal Story
I’ll never forget that one Sunday when I decided to put a twist on our traditional cheesesteak dinner by turning them into sliders. I was inspired after watching a cooking show where celebrity chefs tackled fun party food. I thought, “Why not take a classic and make it bite-sized?” That day, I enlisted my best friend, who was a bit of a novice in the kitchen (bless her heart).
As we chopped and sautéed, flour flew everywhere, and we burst into laughter at our culinary chaos. With a bit of music and too many snack breaks, the sliders emerged from the oven bubbly and glorious! When we set the sliders on the table and watched everyone’s eyes light up, I knew I had struck gold. They were devoured in minutes, with everyone going back for seconds— and thirds! That’s the magic of food—it brings people together in the most unexpected, joyful ways.
Ingredients
Let’s check out what you’ll need for these Philly Cheesesteak Sliders:
-
Slider Buns
Look for soft slider buns like Hawaiian rolls or potato buns for the ideal balance. If you want to keep it low-carb, you can swap them with lettuce wraps! -
Thinly Sliced Beef (like Ribeye or Sirloin)
Ribeye provides a tenderness and depth of flavor that melts in your mouth, but sirloin is a great budget-friendly option. Pro tip: Ask your butcher to slice the beef thin for you! -
Provolone Cheese
This cheese is a classic cheesesteak choice for a creamy, rich flavor. If you’re up for it, try swapping it with mozzarella for a different vibe, or even pepper jack if you’re feeling spicy! -
Onions
Sweet onions like Vidalia add that lovely caramelized flavor. You can also use red onions if you prefer a sharper taste. -
Bell Peppers
I love using a mix of red, green, and yellow bell peppers for a pop of color and an extra layer of sweetness. Don’t have any on hand? Zucchini works well, too! -
Garlic
Fresh garlic takes these sliders up a notch! If you’re in a pinch, garlic powder will suffice—just use about a teaspoon. -
Worcestershire Sauce
This adds a depth of umami flavor. Don’t have it? Try soy sauce as a substitute for a similar salty, savory punch. -
Salt
It’s a necessity for enhancing flavor. Remember, you can always add more, but you can’t take it away! -
Pepper
Freshly cracked black pepper brings a hint of warmth to every bite. -
Butter
A little melted butter brushed on top of the buns creates an irresistible golden crust. You could also use olive oil if you want to save on calories.
Step-by-Step Instructions
Alright, let’s get cooking! Here’s a foolproof guide to whipping up the best Philly Cheesesteak Sliders that’ll have your friends ringing your doorbell every week.
1. Prep Your Ingredients
- What to Do: Start by gathering all your ingredients and chopping the onions and bell peppers. Thinly slice your beef if it’s not already prepped.
- Chef Tip: It’s always a good idea to chop ahead of time. It keeps you organized and flowing in the kitchen!
2. Sauté the Veggies
- What to Do: In a large skillet, melt 2 tablespoons of butter over medium heat. Toss in the onions and bell peppers. Sauté until the onions turn translucent and the peppers are soft.
- Chef Insight: Adding a pinch of salt while sautéing helps to draw out moisture, enhancing the flavor of the veggies!
3. Add the Beef
- What to Do: Push your sautéed veggies to the side of the skillet. In the empty side, add your thinly sliced beef. Season with salt and pepper. Pour the Worcestershire sauce over the beef. Cook, stirring occasionally, until the beef is browned and cooked through—about 4-5 minutes.
- Chef Hack: For extra flavor, try adding a splash of beef broth while cooking. It adds a rich depth you’ll fall in love with!
4. Mix it All Up
- What to Do: Mix the veggies and beef together well in the skillet to ensure everything is beautifully combined and coated in flavor.
- Chef Tip: Turn off the heat, sprinkle in the garlic, and mix it in. The residual heat will cook the garlic just right without burning it!
5. Assemble the Sliders
- What to Do: Preheat your oven to 350°F (175°C). Slice your slider buns in half horizontally. Place the bottom half on a baking dish. Spoon the beef and veggie mixture generously over the buns, and then layer slices of provolone over the top.
- Chef Insight: You can add a little more Worcestershire or hot sauce over the beef mixture for an added kick!
6. Caps Off and Butter Up
- What to Do: Place the top half of the slider buns on the cheese and brush melted butter over the tops generously.
- Chef Hack: To really jazz them up, sprinkle some garlic powder or onion powder over the butter before baking!
7. Bake Time
- What to Do: Cover with foil to keep them moist and place them in the oven. Bake for 15 minutes, then remove the foil and bake for an additional 5-10 minutes until the tops are golden and the cheese is melty.
- Chef Tip: For a crispier top, you can broil them for a minute at the end—just keep a close eye on them!
8. Serve and Enjoy!
- What to Do: Once out of the oven, let them rest for a couple of minutes. Slice into individual sliders and serve immediately!
- Chef Insight: They taste great on their own, but if you want to get creative, whip up a garlic aioli or spicy ketchup for dipping!
Serving Suggestions
To really make your Philly Cheesesteak Sliders shine, present them on a large platter or cutting board. Use a simple parchment paper liner for a rustic vibe, or go fancy with fresh herbs like parsley or cilantro scattered around for a pop of color. These sliders pair beautifully with crispy potato chips, pickles, or even a side of homemade coleslaw to complete the feast!
Recipe Variations
Here are a few fun twists you can try with these sliders:
- Buffalo Chicken Sliders: Use shredded chicken mixed with buffalo sauce and blue cheese for a spicy kick.
- Veggie Sliders: Swap the beef for mushrooms and zucchini for a delicious vegetarian option.
- BBQ Cheesesteak: Add BBQ sauce to the beef mixture for a sweet and smoky flavor.
- Spicy Cheesesteak: Toss in jalapeños or drizzle some sriracha over the beef for an extra kick.
- Mushroom & Swiss: Replace the provolone with Swiss cheese and add sautéed mushrooms for a rich flavor combo.
Chef’s Notes
Is there anything better than a meal that brings people together? Every time I make these sliders, it reminds me of that lively Sunday dinner filled with laughter and fun. It’s amazing how one recipe can evolve over time. The original cheesesteak tradition has turned into a slider-night favorite at my home!
The beauty of these sliders is that they are deceptively simple yet impressive enough to serve to guests! They remind me not to overthink cooking—just enjoy the process. So, when you find those moments of joy in the kitchen, hold onto them; they’ll become your best cooking memories!
FAQs and Troubleshooting
Q: Can I make these sliders ahead of time?
A: Absolutely! You can prepare the beef and veggies the night before and store them in the fridge. Just assemble the sliders and pop them in the oven when you’re ready to eat!
Q: What if my sliders turn out soggy?
A: Soggy sliders can come from too much moisture in your ingredients. Make sure to sauté your veggies well and let them cool slightly before assembling the sliders.
Q: Can I use a different type of cheese?
A: Of course! Cheese choices are endless! Try cheddar for a sharp bite or gouda for a smoky flavor.
Q: Are these sliders freezer-friendly?
A: Yes! You can freeze the cooked sliders. Just make sure to wrap them tightly. When you’re ready, reheat them in the oven from frozen—just add a few extra minutes!
Nutritional Info
Calories: Approximately 300 per slider (varies based on specific ingredients)
Protein: Approximately 15g
Carbs: Approximately 30g
Fat: Approximately 15g
So that’s it, friends! You now have everything you need to create the ultimate Philly Cheesesteak Sliders. Whether it’s a cozy family night, a laid-back get-together with pals, or game day excitement, these sliders will be the star of the show. Now grab your apron, put on your favorite playlist, and let’s get cooking! 🎉
PrintPhilly Cheesesteak Sliders
Transform the classic Philly cheesesteak into bite-sized sliders perfect for any occasion.
- Prep Time: 15 minutes
- Cook Time: 30 minutes
- Total Time: 45 minutes
- Yield: 12 sliders
- Category: Appetizer
- Method: Baking
- Cuisine: American
- Diet: None
Ingredients
- Slider Buns
- Thinly Sliced Beef (like Ribeye or Sirloin)
- Provolone Cheese
- Onions
- Bell Peppers
- Garlic
- Worcestershire Sauce
- Salt
- Pepper
- Butter
Instructions
- Prep your ingredients: Gather all your ingredients and chop the onions and bell peppers.
- Sauté the veggies: In a large skillet, melt 2 tablespoons of butter over medium heat. Toss in the onions and bell peppers.
- Add the beef: Push your sautéed veggies to the side of the skillet. In the empty side, add your thinly sliced beef.
- Mix it all up: Mix the veggies and beef together well in the skillet.
- Assemble the sliders: Preheat your oven to 350°F (175°C). Slice your slider buns in half horizontally.
- Caps off and butter up: Place the top half of the slider buns on the cheese and brush melted butter over the tops generously.
- Bake time: Cover with foil and bake for 15 minutes, then remove foil and bake for an additional 5-10 minutes.
- Serve and enjoy: Let them rest for a couple of minutes, slice into individual sliders and serve immediately.
Notes
Serve with a garlic aioli or spicy ketchup for dipping.
Nutrition
- Serving Size: 1 slider
- Calories: 300
- Sugar: 2g
- Sodium: 800mg
- Fat: 15g
- Saturated Fat: 7g
- Unsaturated Fat: 6g
- Trans Fat: 0g
- Carbohydrates: 30g
- Fiber: 1g
- Protein: 15g
- Cholesterol: 45mg
Keywords: Philly Cheesesteak, Sliders, Appetizer, Party Food, Quick recipe