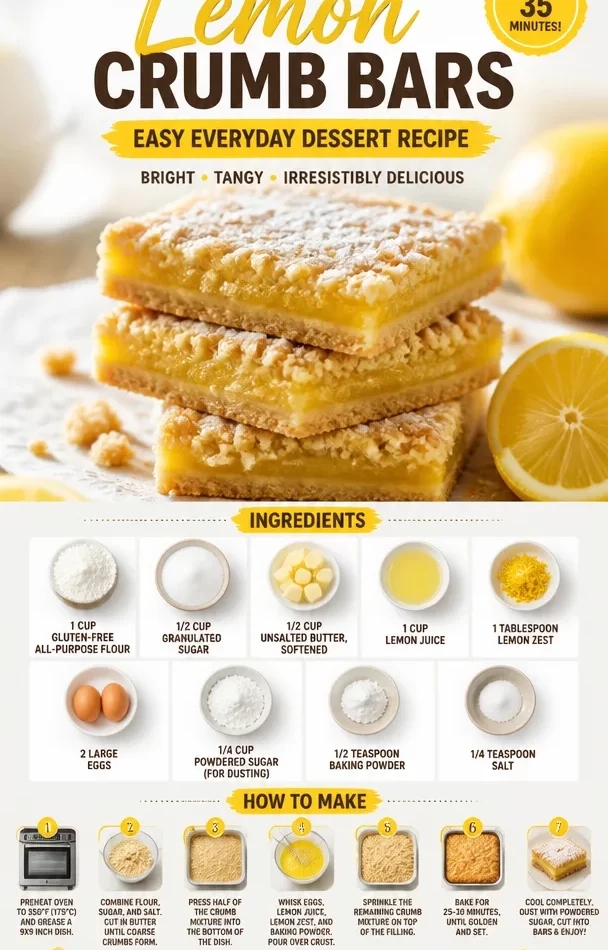
Homemade Lemon Crumb Bars: The Perfect Sweet & Tangy Treat
Hey friend! Are you ready to whip up something absolutely delightful in your kitchen? Today, we’re diving into the sunny world of Homemade Lemon Crumb Bars! These bars are the epitome of a nourishing dessert, bursting with zesty lemon flavor, balanced out by a sweet crumbly topping. They’re perfect for sharing (or keeping all to yourself—we won’t judge!).
Picture this: It’s a sunny afternoon, and you’re in your kitchen with the smell of fresh lemons wafting through the air. A bite of these lemon crumb bars brings a burst of sunshine straight to your taste buds, and trust me, you’ll find every reason to make these. Gather your ingredients, and let’s get to baking!
A Slice of Nostalgia
Growing up, nothing screamed “summer” to me quite like the smell of lemons. My grandmother had a little lemon tree in her backyard that seemed to grow the best fruit. Each visit, we’d race to see who could pick the most lemons (of course, I always tried to snag the biggest one!). She would make her famous lemon bars—a family staple! Those golden squares with their buttery crust and tangy filling became a summer tradition, bringing family and friends together for picnics and potlucks.
One afternoon, after a successful lemon-picking spree, I watched her carefully pour the lemon mixture over the warm crust, her eyes twinkling with excitement. Once chilled and dusted with powdered sugar, they were the toast of the dessert table. I remember biting into those bars, the tangy lemon cutting through the sweetness, and thinking, “This is magic!” Now, it’s my turn to recreate that same magic and share it with you. Let’s create some memories together, shall we?
Ingredients You’ll Need
-
1 cup gluten-free all-purpose flour
Using gluten-free flour is a fantastic way to cater to dietary needs without sacrificing flavor. You can swap it with regular flour if gluten isn’t an issue! -
1/2 cup granulated sugar
This is the sweetness factor. While granulated sugar is classic, feel free to use coconut sugar for a richer flavor. Just be mindful that it may change the color of your bars slightly! -
1/2 cup unsalted butter, softened
Butter provides richness and creates that melt-in-your-mouth texture. If you want a dairy-free option, coconut oil can work too! Just ensure it’s in a solid state before mixing. -
1 cup lemon juice
Freshly squeezed lemon juice is a game changer! You’ll get a fresh and vibrant flavor. Bottled lemon juice just doesn’t have the same zing! -
1 tablespoon lemon zest
Zesting amplifies the lemony flavor. So don’t skip this! Use a microplane for fine zesting. If you’re out of lemons, lime is a fab substitute—even a mix can surprise you! -
2 large eggs
Eggs are crucial for binding your filling together. For a vegan alternative, consider using flax eggs (mix 1 tablespoon of ground flaxseed with 2.5 tablespoons of water) or applesauce! -
1/4 cup powdered sugar (for dusting)
This is for that lovely finishing touch. You can use a sugar substitute if you’re looking for a lower-calorie option. -
1/2 teaspoon baking powder
Baking powder gives your filling a little lift. You can swap it with baking soda, but it may alter the flavor slightly. -
1/4 teaspoon salt
A pinch of salt enhances the flavors and balances the sweetness. If you’re going low-sodium, you could skip it, but a little salt goes a long way!
Step-by-Step Instructions
Step 1: Preheat the Oven
Let’s kick things off by preheating your oven to 350°F (175°C). This is an essential step, as it ensures even cooking from start to finish.
Step 2: Prepare Your Baking Dish
Grab an 8×8 inch baking dish and line it with parchment paper, leaving some overhang for easy removal later. Gently grease the paper with a little butter or spray to prevent sticking.
Step 3: Make the Crust
In a medium mixing bowl, combine the gluten-free flour, granulated sugar, and baking powder. Add the softened unsalted butter, using your fingers or a pastry cutter to blend until you get a crumbly mixture resembling wet sand. If it’s too dry, add a teaspoon of cold water—just watch it doesn’t get too wet!
Step 4: Press and Bake the Crust
Once your crust mixture is ready, press about two-thirds of it firmly into the bottom of your prepared baking dish. This creates a solid crust base. Bake for 15 minutes until it’s lightly golden brown. Your kitchen will smell heavenly already—take a deep breath!
Step 5: Prepare the Filling
While the crust is baking, you can whip up the lemon filling. In a mixing bowl, whisk together the eggs, sugar, lemon juice, lemon zest, and salt until well blended. Then, pour the filling over the warm crust, spreading it evenly.
Step 6: Add the Crumb Topping
Now for the best part! Crumble the remaining crust mixture over the top of the lemon filling. This topping will create the signature crumb that everyone loves!
Step 7: Bake the Bars
Return your dish to the oven and bake for an additional 20-25 minutes, or until the filling is set and the top is lightly golden. Keep an eye on it; you want that lovely golden crust!
Step 8: Cool and Dust
Once baked, take your bars out and allow them to cool at room temperature before transferring them to the fridge. Getting them cold ensures cleaner cuts! After a couple of hours of chilling, dust with powdered sugar right before serving for that open invitation to indulge.
Serving Suggestions
Slice your lemon crumb bars into squares, and arrange them on a colorful platter. You can garnish each piece with a fresh mint leaf or a thin slice of lemon for added flair! Your guests will be drawn in by the visual appeal before they even take their first bite. Serve them chilled or at room temperature with a dollop of whipped cream on the side for that extra indulgence.
Recipe Variations
- Berry Lemon Crumb Bars: Add a layer of fresh berries (like blueberries or raspberries) between the crust and lemon filling for a fruity twist.
- Matcha Lemon Bars: Mix in a teaspoon of matcha powder into the filling for a beautiful color contrast and unique flavor.
- Ginger Spice: Add grated fresh ginger or ground ginger to the crust for a sweet and spicy depth.
- Coconut Lime Bars: Combine lime juice and lime zest instead of lemon for a tropical twist.
Chef’s Notes
I can still picture my grandmother’s kitchen as we baked together. She had this knack for turning simple recipes into profound experiences, and these lemon bars were no exception. Over the years, I’ve played with this classic dessert, left my own personal touches, and adapted it to suit modern tastes, yet the nostalgic flavor remains. Making these bars is about more than just food; it’s about love, tradition, and the joy of sharing stories around the table.
FAQs and Troubleshooting
Q: My filling is too runny; what went wrong?
If your filling doesn’t set, it may be because it was underbaked. Always ensure it’s set in the middle before removing it from the oven!
Q: Can I make these bars ahead of time?
Absolutely! These bars are perfect for make-ahead treats. They actually taste even better the next day as the flavors meld.
Q: The crust didn’t hold together well. What did I do wrong?
This often happens if the butter isn’t sufficient or the crust is too dry. Ensure your butter is softened and mix well until you get that sandy texture.
Q: Can I freeze lemon crumb bars?
Yes! They freeze wonderfully. Just wrap them tightly in plastic wrap and foil before placing them in the freezer. Thaw in the fridge before serving!
Nutritional Info (Optional)
While these delicious bars are indulgent, they can fit into a balanced lifestyle. The nutritional value will depend on the specific brands and types of ingredients used, but generally, for each bar, you can expect around 180 calories, 8g of fat, and 20g of carbohydrates (with adjustments for substitutions you may choose!).
Now that you’ve got the scoop on these mouthwatering Homemade Lemon Crumb Bars, it’s time to create a little magic in your kitchen! Bake with love, share the joy with others, and savor each and every bite. Happy baking! 🍋✨
PrintHomemade Lemon Crumb Bars
Delightful lemon crumb bars with a sweet, tangy flavor and a crumbly topping, perfect for sharing or enjoying on your own.
- Prep Time: 15 minutes
- Cook Time: 35 minutes
- Total Time: 50 minutes
- Yield: 16 servings 1x
- Category: Dessert
- Method: Baking
- Cuisine: American
- Diet: Vegetarian
Ingredients
- 1 cup gluten-free all-purpose flour
- 1/2 cup granulated sugar
- 1/2 cup unsalted butter, softened
- 1 cup lemon juice
- 1 tablespoon lemon zest
- 2 large eggs
- 1/4 cup powdered sugar (for dusting)
- 1/2 teaspoon baking powder
- 1/4 teaspoon salt
Instructions
- Preheat the oven to 350°F (175°C).
- Prepare an 8×8 inch baking dish by lining it with parchment paper and greasing it.
- Combine the gluten-free flour, granulated sugar, and baking powder in a medium mixing bowl. Blend in the softened butter until crumbly.
- Press about two-thirds of the mixture into the bottom of the prepared baking dish and bake for 15 minutes.
- Whisk together the eggs, sugar, lemon juice, lemon zest, and salt in a bowl. Pour over the warm crust.
- Crumble the remaining crust mixture over the lemon filling.
- Bake for an additional 20-25 minutes or until set and lightly golden.
- Cool to room temperature, then refrigerate before dusting with powdered sugar and serving.
Notes
You can add fresh berries for a fruity twist or mix in matcha powder for a unique flavor.
Nutrition
- Serving Size: 1 bar
- Calories: 180
- Sugar: 10g
- Sodium: 100mg
- Fat: 8g
- Saturated Fat: 5g
- Unsaturated Fat: 3g
- Trans Fat: 0g
- Carbohydrates: 20g
- Fiber: 1g
- Protein: 2g
- Cholesterol: 40mg
Keywords: lemon bars, dessert, baking, summer treat, gluten-free